Friday, June 27, 2014

How to update your kitchen without spending a lot of money

I love having a functional kitchen.

When I started working on the kitchen, knowing that I was going to be redoing my re-do, I didn't think I'd go quite this far but one thing's led to another and I think we're finally done for a bit. You know, like a couple of months...

This week, we finished the backsplash. Again, wasn't planning a backsplash, but it became necessary when I pulled off the old vinyl to paint. Since one of the fastest and potentially least expensive updates to a kitchen is a new backsplash, I wasn't going to complain.


I didn't want to spend a fortune on tiling the entire area between the cabinets or on really nice, permanent tile because I don't intend for it to stay and I'd hate to damage the bank of cabinets that are staying.

After quite a bit of time at a few stores, looking at every option available, I settled on penny tile going far enough up the wall to remove the damage.

Penny tile is one of the most historically appropriate tiles to use in old homes, much like the basketweave, subway and hex tiles we used in the Saga of the Wood-Paneled Shower's restoration. As you may have guessed from the name, it looks like pennies!

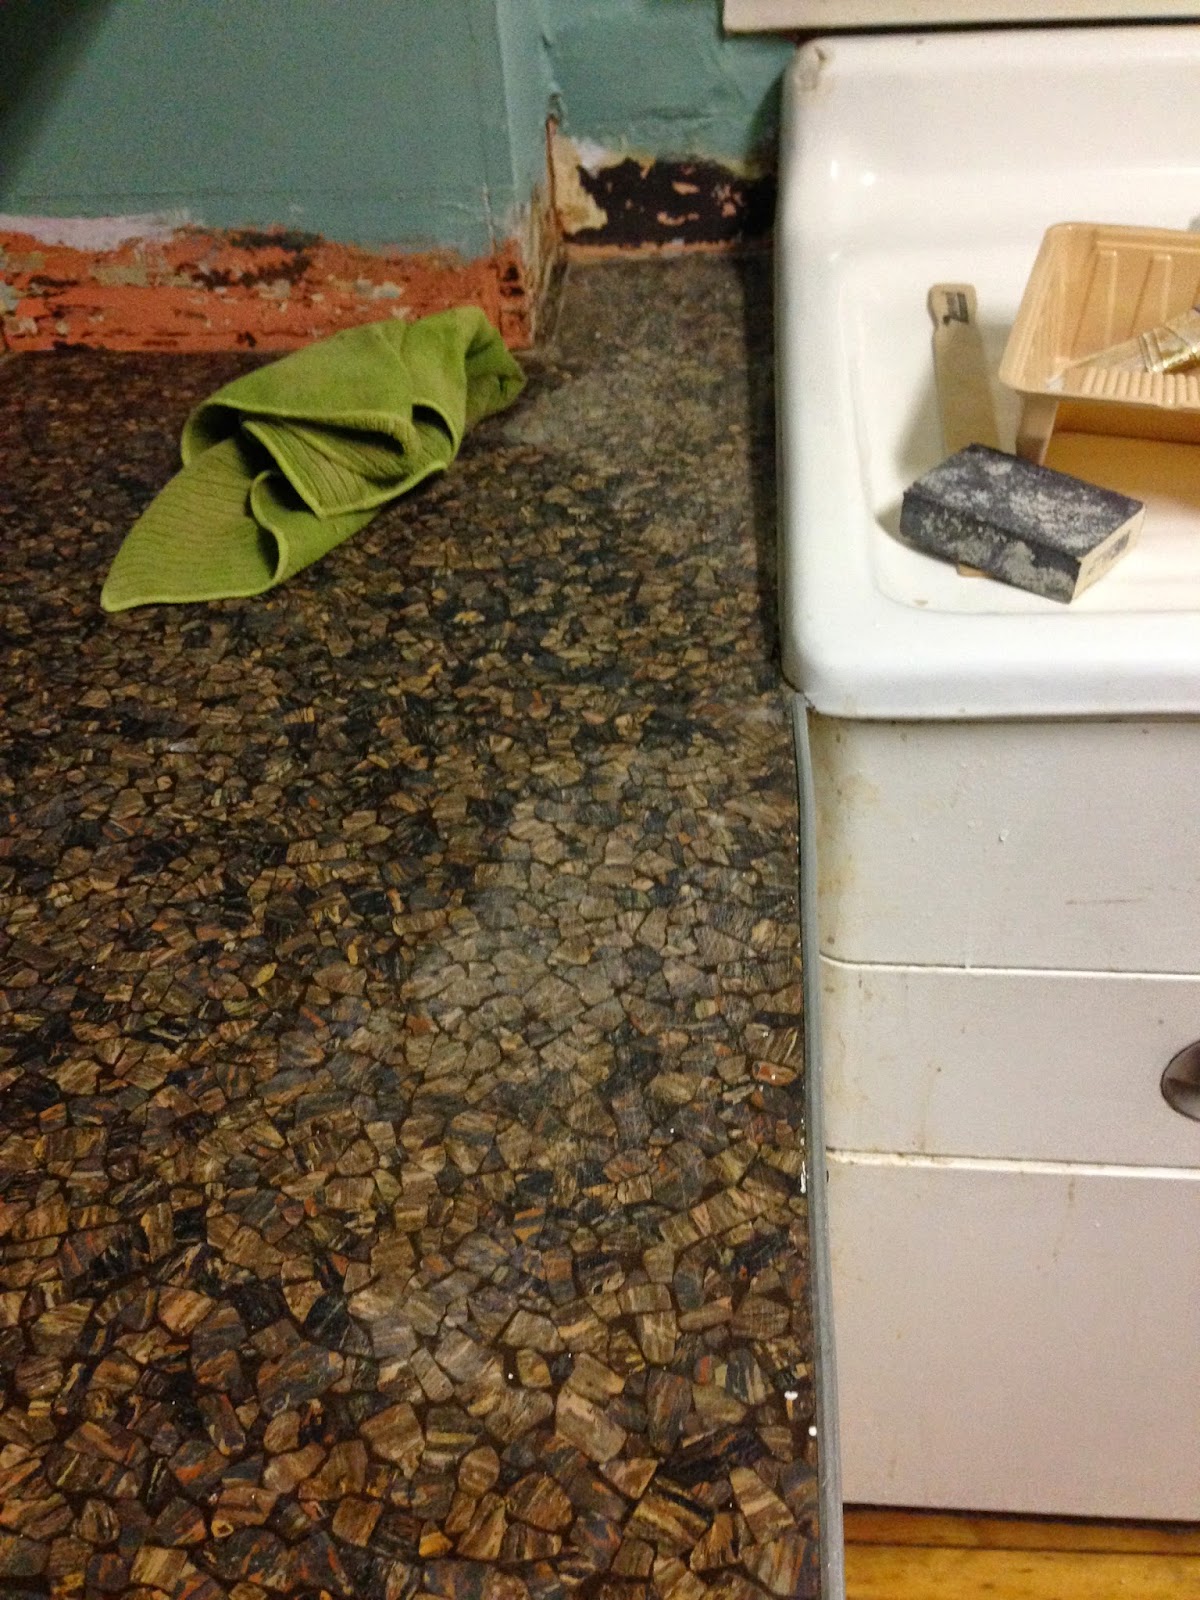
First, I had to measure off the area that needed to be covered. You can cut penny tile sheets into strips, which allowed me to get two to three linear feet out of one square foot (one sheet) of penny tile that runs about $6.79/sheet.

Once I'd established that it needed to go up six rows, I cut a bunch of strips and started laying them out to make sure each new strip met the former properly.


Once the tile was laid out, I had to tape off the area I'd need to thinset for the tile. Since the tile was only going partway up the wall, it was suuuuper important that I get it taped off correctly so we wouldn't end up with thinset and, eventually, grout outside of the tiled area.


Then, because we were looking at such a small space to be tiled, I could get the thinset on a full section of the wall using a notched trowel (if you're doing bigger areas of tile, like a shower, work in smaller chunks or the thinset will dry before you can stick the tile to it).


It's also important to stick up the tile and make sure the lines are all straight and the dots are evenly spaced. It's easiest to just eyeball it and squish them around a bit as necessary. Once I have everything where I think it should be, a grout float can help get it all squished down. You don't want to be looking at the tile wishing you'd moved that one that's just a little too far to the left!


After getting everything in place, make sure to clean up excess thinset between the tiles so that it doesn't show after you apply the grout (especially if, like me, you use a white thinset and plan on using a grey grout since I already had both from previous projects) and peel off the tape while the thinset is still wet.

I gave the thinset a couple of days to dry (especially in the local humid weather) and then taped off again to get ready for grout.


Grout's about as easy as it comes. Literally, smear it on with a grout float and squish it between all of the tiles evenly. In my case, I also made sure there was enough over and below the tile to create a nice edge after removing the tape lines.

Wipe it off with a damp sponge and then with a dry, clean sponge until it's clean - trust me, you don't want to leave any dirty water on your tile, it's a nightmare to clean once it's dry and set.


Peel off the tape as soon as you have the grout as you like it (carefully so you don't smear it - I pull at an angle) and definitely while the grout it still wet and you're done!

So there you have it! We have a beautiful, newly backsplashed kitchen! What do you think for a total project cost of less than $40?

Thursday, June 19, 2014

Not even tornadoes tearing this down!

I would not say that I have a green thumb. Generally speaking, I travel too much to water things regularly, probably over-water when I am around and usually get enough mosquito bites when I do work in a garden that a normal person would think I have poison ivy.

None of that matters though, because Isthmus House needs a yard that doesn't look like this!


When we first moved in, the backyard was well past overgrown, having been left untended for many, many moons. Believe it or not, this is better than when we moved in.

Once my parents came to visit, it only made sense to get the yard revamped before it got too hot to work on anything outside at all. Despite wind chills of as much as -50° Fahrenheit this winter, summers in Madison can also get right around 100° - not fun work conditions.

My mom took charge immediately, deciding what flowers and colors would look best in what arrangement (design decisions influenced by yours truly) and my dad and I got to work.


First up was getting the hedges trimmed since they were a tad unruly. Fortunately, the previous owner left some weathered but perfectly capable gardening equipment so I saved a few dollars not having to buy new hedge clippers, pruning shears, and a few other items.


Seemingly instantly, we had improvement just from trimming the hedges and getting rid of all the rubbish underneath them.


Once all of the rubbish was up, it was important to plan everything out for spacing. You know what they say: something about planning being most of the project. Then again, I don't think they were trying to dig in packed soil...


For all of the edging stones to create a level border for the new plant beds, I had to dig down a couple of inches into the soil. It's better to do that before putting down weed blocker cloth so that the cloth can sit directly under the rocks and not move around.

After the trench is dug, life gets pretty easy from there.

I pulled the edging stones back out from their trench so that I could lay out weed cloth. It's a black, tear and UV-resistant cloth that keeps weeds (aka indigenous plants that keep your soil fertile until it's time for a change) from poking through new prettiness. Metal stakes hold it down and provide a good base for any mulch.

From there, planting is also pretty easy. To plant, cutting an "x" cut with a utility knife through the fabric where plants are going is easiest before digging out a hole, fitting your plant so it's soil/peat pot is about level with the ground and filling back in with soil. 


Courtesy of the nice, level trench, putting the stone back in their trench (making sure to cover all of the edges of the weed cloth!) was a cinch. A rubber mallet evens out any that aren't completely certain they want to fall into place.

Finally, our last step for the garden bed was mulch! You need way more mulch than you think you do. This little project took eight large bags. The Roommate, who's more accustomed to something closer to three truckloads from her childhood, didn't seem overly impressed with the quantity.

Last, we put down top soil and grass seed. Sadly, it was getting later and I didn't get any pictures so you'll have to take my word for it. Here are the steps to do it in your lawn!


  1. Add top soil - they do make special top soil for planting and reseeding lawns but at about $7/bag compared to $2/bag for the normal stuff, we opted for a 1 expensive bag mixed with 2 normal bag ratio.
  2. Seed! Get the good stuff, people, and read the label. If your lawn doesn't get sun, don't get the stuff that needs sun. You can use a distributor (either a little one that you crank by hand while you walk or one that you push) to fwing out the seed or just scatter it like you would feed a flock of chickens. My distributor wasn't working, so I went with the latter method for my tiny yard.
  3. Put straw over it. This allows the nice things like sun and water to get to the grass seed but makes it more challenging for critters to walk, crawl or fly away with your hard work!
  4. Water. This goes for all of your plants! 


So there you have it - a brand new front lawn and the beginning of actual curb appeal! If you're local and experienced the storm (complete with tornadoes that did rather a lot of damage nearby), don't worry! We were untouched in the storm. We're guessing that means we're supposed to keep going so more to come soon - hopefully before it hits 100°!


Thursday, June 12, 2014

Forget the paint, let's try stain!

I love finished projects. Every little project makes up a bigger project and getting those done is one step closer to a restored home.

Last week, we talked about the eyesore that was my front porch. Like so many other things, it was detracting from the charm Isthmus House still had when we bought it and has now. It was bad enough that I specifically asked the inspector about it because I was worried it might be rotten and have future problems.

After ripping off the carpet and scrubbing the wood to within an inch of its proverbial life, we were doing a lot better than where we started (one little project down!).


Better wasn't good enough in this case, though. A few of the boards were in rougher shape and, after the porch dried, it wasn't quite this pretty red color - more like a dusty brown with just a hint of red.


Once again, where old wood needing restoration came in, so did the paint stripper. This time, I used some specifically designed for use with the cleaner and semi-transparent restorative stain I chose from Behr.


This time, I was supposed to pour it directly onto the floor, roll it out with a standard paint roller and use a brush for the corners. In addition to getting more than you think you'll need (I went through about a bottle and a half for multiple layers on a small porch), I would strongly recommend a mask, glasses, chemical gloves, long pants you don't care about and non-slip shoes for this.

The paint stripper that did get on my clothes came out in the wash for me but it splatters quite a bit when you pour (even if you're fairly close to the floor).

After giving the stripper a while to set, I used a putty knife to gently peel off the paint that had separated.


And then did another coat.


And waited.


And washed it off (SO much water to rinse it off!)


Another coat or two and rinse and wash or two later, and we'd gotten all the way to this:


 In a perfect world, I would have just taken my chances and gotten some stain on it. This, however, requires a minimum of 24 hours of dry time. Once it was dry, it needed sanding too.

Sanding, re-washing, re-rinsing and re-drying later, we were finally ready for stain!

Because of the wait time (that I never had in one chunk), I vacuumed it one more time before putting down the stain just in case.

Unlike the stripper, the stain needed to be applied with either a brush or a deck pad, not a roller. I cut in with the brush and then worked in strokes as long as possible following the grain so the boards didn't dry looking like I painted half and took a break.


After one coat, I was pretty pleased with how things were turning out...


And after two coats, I thought it looked waaaaay better and left it alone. There are still a few areas to touch up, but, it's come a long way.

We waited 3 days for dry time this time and got lucky with only one slight drizzle Personally, I still think it's a little tacky when you walk on it but, living a block and a half from a late does come with a few, rather manageable consequences.


What do y'all think of the latest view? Anyone spot what next week's entry just might be on? Happy hunting!

Thursday, June 5, 2014

When the going gets tough, rip up more carpet!

I love restoring this house, don’t get me wrong, but things also go wrong occasionally. I find a new surprise somewhere and it hits the budget or something takes approximately 134,847 times longer than it should have and that can get really frustrating.

At the end of the day, this is and will be worth it. The house is starting to come together but, this week, we’re talking about the front porch – and taking it apart.

One day, while working on stuff outside in general and encountering one or two of those setbacks, I decided I just couldn't take the weathered greenish brownish carpet on the front porch anymore...


so I ripped it off!


And found another layer of what was probably, at one point, carpet pad along with orange fibers under the staples holding it down (i.e. there was once bright orange carpet on the front porch). I couldn't believe just how dirty it was, even knowing that the carpet had likely been there for years.


I brought out my handy-dandy shop-vac and spent the next twenty minutes or so learning that my front porch was painted - you just couldn't tell through the grime.


After vacuuming, I decided it probably wouldn't hurt to give it a quick rinse and it turned into this!


The Roommates could hardly believe it when they got home (one actually checked the address to make sure she was in the right spot) and loved the difference. It makes the front of the house look way better even with a few damaged boards. 


Sometimes, though, you have to take a step back to take a step forward. So stay tuned – next up, we’re stripping the porch and fixing what's broken!

Thursday, May 29, 2014

Happy Anniversary! Now fix your countertop

Yay! It's hard to believe, but yesterday marks one year since I bought Isthmus House!

Despite the fact that I'm currently in across the Pond visiting some friends in Amsterdam and London, I didn't forget you, dear readers. Progress continues at the House on the Isthmus and we've finished with another of the temporary fixes to the kitchen that will likely never completely end (as far as I can tell).

Once we opened up the door to the foyer and finished painting the cabinets and walls, it became painfully apparent that the countertops were in really rough shape.


Added during one of the many renovations to Isthmus House, these were a little dicey - and not just because of the color, texture or fact that I could never be certain they were clean - so I decided to paint them too.

Rustoleum makes a countertop paint that bonds to laminate (and some other surfaces) that's essentially a tinted epoxy. In our case, I didn't love any of the colors they offered (we wanted to go darkish but the best option, Pewter, looked purply-blue) so the guy at the paint counter helped me get closer to what I wanted by adding a half drop of yellow here and a drop of black there.

I got started when there would be limited exposure for The Roommates because this is at least a three day project. First was cleaning the tops as best possible - they were prettier when wet.


After they were completely dry, I lightly sanded them to get any remaining grease (hey, they're probably 60-70 years old!), grime or dirt off so that paint could better adhere.


Lots of scrubbing later (to make sure they were clean for the epoxy), I let them dry for about 45 minutes just to be sure.

If you can, apply the paint with a roller for as much of the surface as possible. Here are the rules of the countertop painting road:

1) You will need a good brush that you can control well in small spaces and a small, high quality roller cover and paint tray.
2) This project will be the last time you use these items. Be prepared to throw them out when you're done.
3) The fumes can get pretty strong. Work in a very well ventilated area and consider wearing a mask (you can get masks at paint stores or in the paint supply aisle).
4) You'll only get one shot.

I started out with the cut ins and I think that was the right choice in part because you need to work pretty quickly with this product. By brushing the paint to the edges by hand (and cleaning up any mistakes with my thumbnail within about 10 seconds), the surface was easily smoothed of brush strokes by the roller right after.

I didn't have to do multiple coats but chose to do two anyway because it looked smoother to me.

Immediately, the finish looks as it will look permanently and the color is only slightly lighter than it will be when dry.

I really didn't want myself or The Roommate to accidently put a hand down on the counters during the THREE days they have to dry so I put up a sign or six...


Fortunately, we didn't touch them, so after waiting three days for them to dry and darken up a bit, the tape was ready to come down.

 
Now, we have durable, prettier to look at counters in a kitchen that just keeps getting better!


Next up, we should probably fix that backsplash. Stay tuned!

Thursday, May 22, 2014

The right-for-now way

When I left my last apartment, the couple moving in wanted to keep the paint I'd put up... but have me pay for repainting too in case the people after them didn't like it. I didn't really appreciate that so much so, in the end, it was repainted before they moved in.

Paint is one of the first things a lot of people change when they move into a new place and it makes sense. It's inexpensive, can make almost anything go from truly hideous to not that bad, and isn't overly time consuming.

Funny enough, those were the same criteria that led me to painting our kitchen.

The kitchen was bad when we moved in. Aside from the cobwebs covering everything, the illegal light hanging over the sink (you're not supposed to plug those into the outlet on your counter - go figure), the cabinets that had tenants of their own and about six square feet of counter space, there was also wallpaper, buckled plaster, and really, really bad paint.


Normally, I would suck it up and take down the wallpaper, deal with the plaster and get everything underneath into good working order before throwing a coat of paint on it and calling it a day. That said, we're going to be redoing the kitchen for real in just a few months and there was no reason to go through that now for what's really a band-aid fix.

Instead, I yanked the vinyl "backsplash" off the wall directly above the countertop. They'd probably been there for about 50 years - attractive, no?

Before

After

 Once I had that all chipped off (or at least level enough that I can get a backsplash in), I got to priming clean walls.

I do use paint+primer in one and it does make life a lot easier but I'm still a fan of sealing everything in with a solid first coat of high quality primer. Then I usually only need one coat and a few touch ups when I do go back with paint.


It's not particularly pretty, but it does work!

Once the primer dried, I could get some paint on those walls and make it look a little less like a dungeon.

Lots and lots of cutting in

To make the color, I mixed a little bit of white with the color we used in the bathroom. It made it look greener which worked out well.


It's amazing how much a coat of paint can change and while I can't wait to really get to it, this'll do for now!
 

Thursday, May 15, 2014

So, you say I should close off an original door?

I'm not a purist. I've learned that there are absolutely areas to be a purist and there are areas it's more important to be practical. For example, I plan on putting in a modern dishwasher eventually.

One thing that lots of people weighed in on relating to this was a door leading from the foyer to the kitchen.

When we moved into the House on the Isthmus, there was a stove in front of the door with a "spice rack" built into the door frame. I use the term "spice rack" generously.


My take was that:
A) It was an original doorway and almost certainly an original door. We don't close off original doorways in my house even if it would give me more counterspace and an easier-to-design kitchen layout. You're going to have to come up with a way better reason for me to close off a doorway (to date, I haven't heard one).
B) Walking around the entire house to get to the kitchen is silly if you could go straight from foyer to kitchen. Who wants to take the long route for a glass of water at 3 am?

My choice was clear - I wanted to see my foyer! - so I got to work moving around the kitchen.


This part had to come first because it's a bit of a reach for me to the top shelf


The spice rack was held together with a few nails and wood chips (two semi-peg-like chips for each side of each shelf) so it didn't take too long to dismantle.


Next, off came the rather hideous, rather flimsy paneling. Once I got my pry bar under it, I pulled the rest off with my (gloved) hands.


Yep, that's flat black paint. Sigh.

Getting the door open was probably the hardest part.

The mortise (the thing that a doorknob controls to open and close an old door) was still in the door so I had to steal a doorknob from my collection if I wanted the pin holding the door closed to move. Once I un-puttied the foyer side of the doorknob hole (seriously, I think it was sticky tac), I could insert the replacement doorknob to turn the pin.

Finally, after a few tries (because, usually, the door is open when you're installing a new doorknob to keep it steady), the door clicked open. Other than a few loose nails that were easily pulled and some weatherstripping that I'm guessing was originally added for sound insulation between units, it came open without too much difficulty.


Now, we can walk in the door and come straight back. It's already been a lot easier to move around the house and we can't wait to enjoy our new traffic pattern while entertaining in just a few weeks! If you're local, come on by!