Thursday, May 29, 2014

Happy Anniversary! Now fix your countertop

Yay! It's hard to believe, but yesterday marks one year since I bought Isthmus House!

Despite the fact that I'm currently in across the Pond visiting some friends in Amsterdam and London, I didn't forget you, dear readers. Progress continues at the House on the Isthmus and we've finished with another of the temporary fixes to the kitchen that will likely never completely end (as far as I can tell).

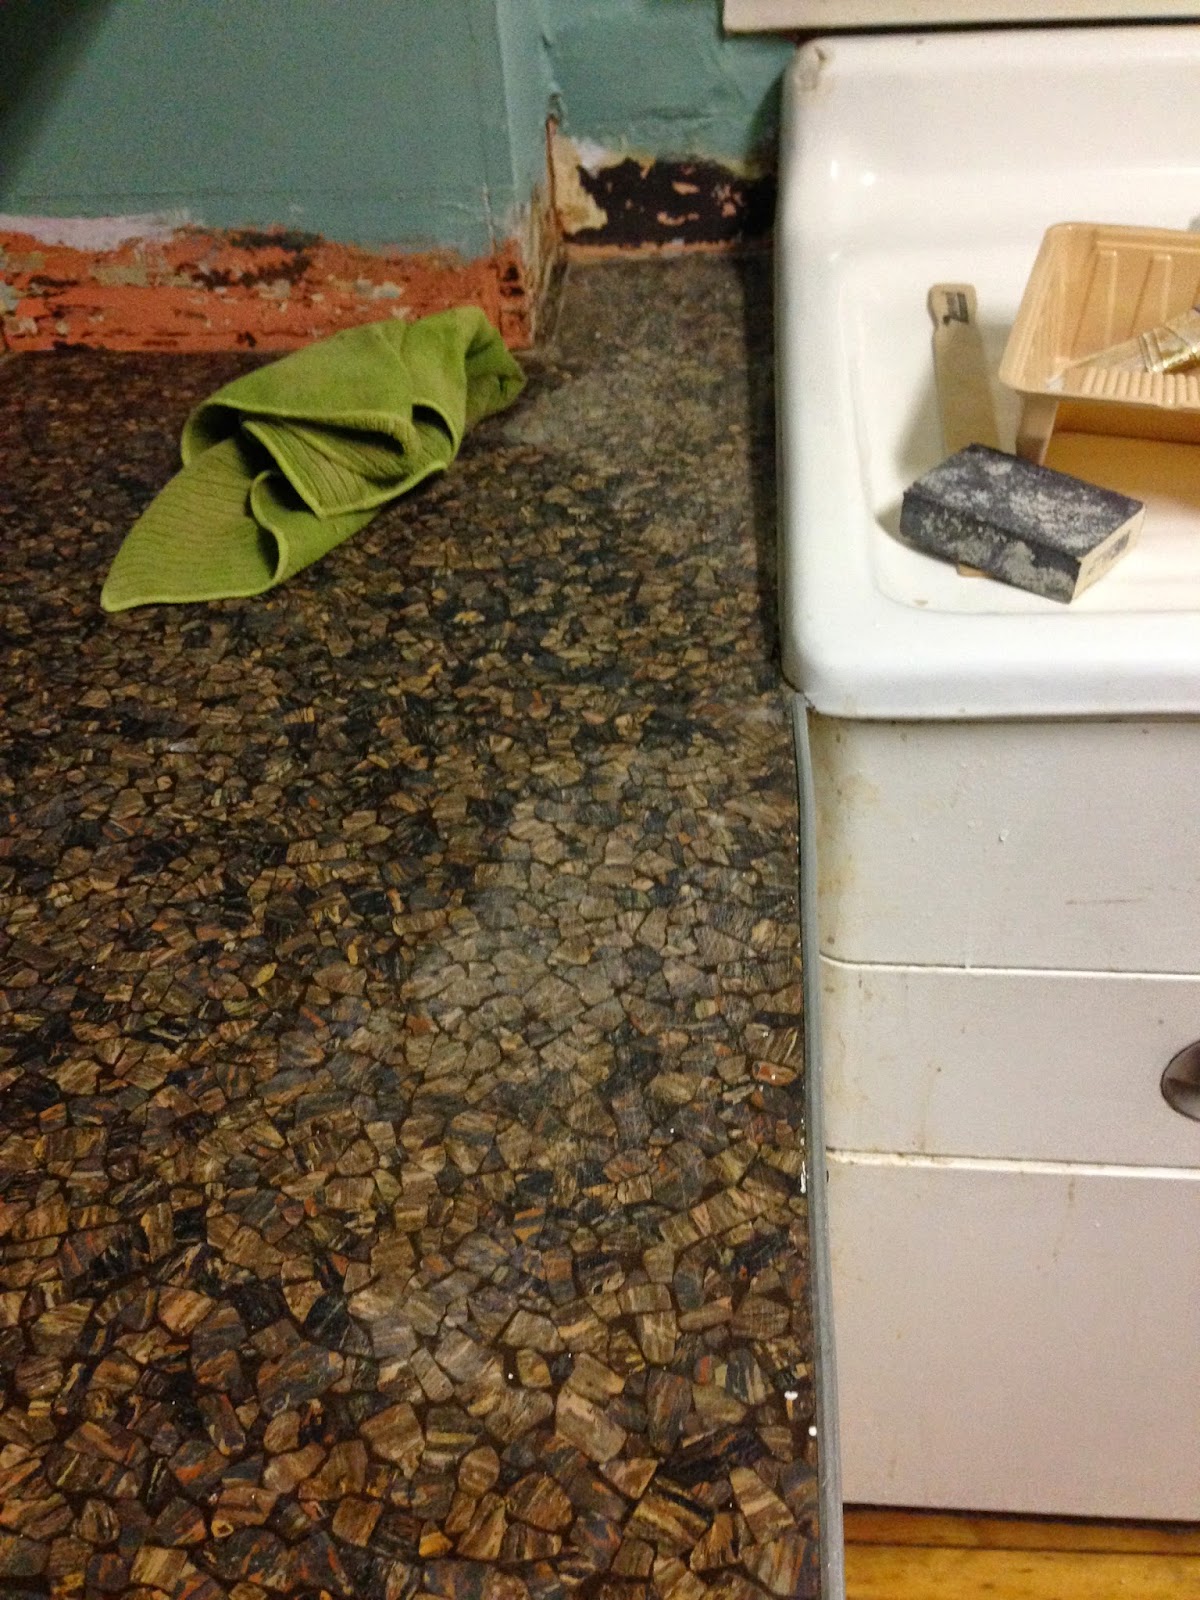
Once we opened up the door to the foyer and finished painting the cabinets and walls, it became painfully apparent that the countertops were in really rough shape.


Added during one of the many renovations to Isthmus House, these were a little dicey - and not just because of the color, texture or fact that I could never be certain they were clean - so I decided to paint them too.

Rustoleum makes a countertop paint that bonds to laminate (and some other surfaces) that's essentially a tinted epoxy. In our case, I didn't love any of the colors they offered (we wanted to go darkish but the best option, Pewter, looked purply-blue) so the guy at the paint counter helped me get closer to what I wanted by adding a half drop of yellow here and a drop of black there.

I got started when there would be limited exposure for The Roommates because this is at least a three day project. First was cleaning the tops as best possible - they were prettier when wet.


After they were completely dry, I lightly sanded them to get any remaining grease (hey, they're probably 60-70 years old!), grime or dirt off so that paint could better adhere.


Lots of scrubbing later (to make sure they were clean for the epoxy), I let them dry for about 45 minutes just to be sure.

If you can, apply the paint with a roller for as much of the surface as possible. Here are the rules of the countertop painting road:

1) You will need a good brush that you can control well in small spaces and a small, high quality roller cover and paint tray.
2) This project will be the last time you use these items. Be prepared to throw them out when you're done.
3) The fumes can get pretty strong. Work in a very well ventilated area and consider wearing a mask (you can get masks at paint stores or in the paint supply aisle).
4) You'll only get one shot.

I started out with the cut ins and I think that was the right choice in part because you need to work pretty quickly with this product. By brushing the paint to the edges by hand (and cleaning up any mistakes with my thumbnail within about 10 seconds), the surface was easily smoothed of brush strokes by the roller right after.

I didn't have to do multiple coats but chose to do two anyway because it looked smoother to me.

Immediately, the finish looks as it will look permanently and the color is only slightly lighter than it will be when dry.

I really didn't want myself or The Roommate to accidently put a hand down on the counters during the THREE days they have to dry so I put up a sign or six...


Fortunately, we didn't touch them, so after waiting three days for them to dry and darken up a bit, the tape was ready to come down.

 
Now, we have durable, prettier to look at counters in a kitchen that just keeps getting better!


Next up, we should probably fix that backsplash. Stay tuned!

Thursday, May 22, 2014

The right-for-now way

When I left my last apartment, the couple moving in wanted to keep the paint I'd put up... but have me pay for repainting too in case the people after them didn't like it. I didn't really appreciate that so much so, in the end, it was repainted before they moved in.

Paint is one of the first things a lot of people change when they move into a new place and it makes sense. It's inexpensive, can make almost anything go from truly hideous to not that bad, and isn't overly time consuming.

Funny enough, those were the same criteria that led me to painting our kitchen.

The kitchen was bad when we moved in. Aside from the cobwebs covering everything, the illegal light hanging over the sink (you're not supposed to plug those into the outlet on your counter - go figure), the cabinets that had tenants of their own and about six square feet of counter space, there was also wallpaper, buckled plaster, and really, really bad paint.


Normally, I would suck it up and take down the wallpaper, deal with the plaster and get everything underneath into good working order before throwing a coat of paint on it and calling it a day. That said, we're going to be redoing the kitchen for real in just a few months and there was no reason to go through that now for what's really a band-aid fix.

Instead, I yanked the vinyl "backsplash" off the wall directly above the countertop. They'd probably been there for about 50 years - attractive, no?

Before

After

 Once I had that all chipped off (or at least level enough that I can get a backsplash in), I got to priming clean walls.

I do use paint+primer in one and it does make life a lot easier but I'm still a fan of sealing everything in with a solid first coat of high quality primer. Then I usually only need one coat and a few touch ups when I do go back with paint.


It's not particularly pretty, but it does work!

Once the primer dried, I could get some paint on those walls and make it look a little less like a dungeon.

Lots and lots of cutting in

To make the color, I mixed a little bit of white with the color we used in the bathroom. It made it look greener which worked out well.


It's amazing how much a coat of paint can change and while I can't wait to really get to it, this'll do for now!
 

Thursday, May 15, 2014

So, you say I should close off an original door?

I'm not a purist. I've learned that there are absolutely areas to be a purist and there are areas it's more important to be practical. For example, I plan on putting in a modern dishwasher eventually.

One thing that lots of people weighed in on relating to this was a door leading from the foyer to the kitchen.

When we moved into the House on the Isthmus, there was a stove in front of the door with a "spice rack" built into the door frame. I use the term "spice rack" generously.


My take was that:
A) It was an original doorway and almost certainly an original door. We don't close off original doorways in my house even if it would give me more counterspace and an easier-to-design kitchen layout. You're going to have to come up with a way better reason for me to close off a doorway (to date, I haven't heard one).
B) Walking around the entire house to get to the kitchen is silly if you could go straight from foyer to kitchen. Who wants to take the long route for a glass of water at 3 am?

My choice was clear - I wanted to see my foyer! - so I got to work moving around the kitchen.


This part had to come first because it's a bit of a reach for me to the top shelf


The spice rack was held together with a few nails and wood chips (two semi-peg-like chips for each side of each shelf) so it didn't take too long to dismantle.


Next, off came the rather hideous, rather flimsy paneling. Once I got my pry bar under it, I pulled the rest off with my (gloved) hands.


Yep, that's flat black paint. Sigh.

Getting the door open was probably the hardest part.

The mortise (the thing that a doorknob controls to open and close an old door) was still in the door so I had to steal a doorknob from my collection if I wanted the pin holding the door closed to move. Once I un-puttied the foyer side of the doorknob hole (seriously, I think it was sticky tac), I could insert the replacement doorknob to turn the pin.

Finally, after a few tries (because, usually, the door is open when you're installing a new doorknob to keep it steady), the door clicked open. Other than a few loose nails that were easily pulled and some weatherstripping that I'm guessing was originally added for sound insulation between units, it came open without too much difficulty.


Now, we can walk in the door and come straight back. It's already been a lot easier to move around the house and we can't wait to enjoy our new traffic pattern while entertaining in just a few weeks! If you're local, come on by!

Thursday, May 8, 2014

Isthmus House gets a little cooler

Last year, shortly after moving into Isthmus House and while The Roommate was off gallivanting in Jamaica and Europe for 3 weeks (Me? Jealous?), I co-hosted a dinner party with a friend.

It was June. The oven was on. And it was hot at the House on the Isthmus.

I don’t remember if we’d put in the fan yet in the living room but I do remember that we had the windows propped as wide as they’d go and the front and side doors open hoping for a crosswind.

While we eventually got the internal temperature to mostly comfortable, that was one of the first experiences of Summer 2013 that made me very grateful for air conditioning whenever I've had it since.

 This year, I thought I’d start preparing for additional house parties early and get air conditioning.

After my requisite several bids, research and getting to an understanding of terms like SEER (Seasonal Energy Efficiency Ratio – tells you how efficient AC units are) and tonnage (definition here: short version is how much cooling you get), I was ready to go.

The crew arrived a little late after apparently having to run to the store to get a new thermostat when mine wasn't delivered with the rest of the installation supplies. Buh-bye 1960s thermostat, welcome, wi-fi enabled thermostat!


After getting the guys acclimated to my basement, backyard and sideyard (where the unit itself was going), they got started drilling holes in my house.

Getting acclimated - this was a little cozy

That might sound a little exaggeratory but I assure you, it’s quite true.

When the new electrical is run through most of your basement (my panel is pretty much in the opposite corner from where the unit was), there are a few holes getting a few new wires.


After dealing with the fact that there were holes in my duct work from other wiring run at some other time (that’s technically okay), I made peace with the hole also drilled right at the cusp of siding and foundation for the wires into the house as well.


It also turned out that we had to punch a hole in my furnace’s ductwork to put in a new coil. Isthmus House was getting holier by the minute! (pun very much intended)


After fabricating a couple of pieces of sheet metal to keep it in place, we were in business – a coil in place, some wires coming through my wall and an AC unit most of the way installed! Granted, I’m being overly simplistic, but that’s the gist of what I understood with asking lots of questions.


Finally, it was just a matter of getting the thermostat installed.
A while back, I decided that I couldn’t keep looking at the gold one on my wall and replaced it with a white one in the same style (because that was my only option based on the wiring in the wall) so we were actually replacing a replacement.

While the electricians were downstairs putting in the wiring for the unit to run off, they added the necessary wiring for a five-wire thermostat (actually, six wire, but this new one only needed five). For reference purposes, my old one was two!
We cut a new hole in my wall (again with the holey house!), ran the wires and connected up. One very large instruction manual for a thermostat later, the crew left and The Roommates and I were left with air conditioning… that we couldn’t turn on yet because it was only about 60 degrees in Madison…

Soon to come is the inspection and then we can get on with enjoying a sure-to-be-toasty Madison summer from the relative cool of Isthmus House!


Thursday, May 1, 2014

But I don't WANT water everywhere!

We’ve established that I never, ever want water in my basement. It causes damage, it smells, it’s all around unpleasant.

Sump pumps can help you control water in your basement and are really pretty simple… in theory.

When there’s excess water running around your basement, it drains to your sump – which is essentially just a cement pit in the lowest part of your basement or crawlspace. In my case, it’s kind of tiny – only twelve inches deep when it’s more common to see 14+ inches deep.

Here’s how they work (if you want to know alllll about sump pumps, go here):

When the water level in the pit gets too high, a float (it, erm, floats) triggers the pump to run. The water is pumped from the pit, up the pipe, past the check valve and outside your home a safe distance away.

Ours is submersible, but the idea is the same
 
Naturally, when our sump pump started being a little finicky (i.e. not always pumping out water when it needed to), I wasn’t thinking about the fact that our sump is rather miniscule. In the interest of not ending up with a basement full of water, I decided to replace it and just headed to the store where I picked up a ½ horsepower pump (I live close to the water, but for a lot of people 1/3 HP is sufficient).

Once at the store, I made one big mistake – I didn’t look at the box and notice that the float (the thing that triggers the pump to start running when the water gets high enough) was in a different place on this pump and wouldn’t be triggered until the water hit 14 inches. After all, why read the box? That would be far too easy.

I didn’t realize this until I’d already gotten home, gotten a new pipe, a new adapter (the old discharge pipe fitting to connect to the pump was not the same as the new one) and the PVC primer and adhesive to bond the pipe to the adapter (I ended up punching holes in the primer and adhesive cans because I gave myself a mild friction burn trying to open them – gloves are your friend). And hooked the whole thing up.

Sigh.

It was back to the store for me and, this time, I checked the box (no metrics) and was assured by the associate that it would work because I didn’t want to make a third visit for a fourth pump.

It didn’t.

Keep in mind, this should be a 15-20 minute project but, by this time, I was onto a fourth pump and going on three hours.


All of the pumps that didn't work.
The dirty one is the old one - guess we know why it failed (hint, it shouldn't be that dirty).


Finally, I took to the internet to find out that the store I’d been going to didn’t actually sell a pump that would work for me. Good to know, albeit a bit after the fact. I finally hunted down the correct pump at a local store in Madison – they had one left and it was a display model.

Since this was to be my fourth sump installation in two days, I was okay with the tradeoff of no instruction manual for half price.


Fifteen minutes after getting it home, I had it hooked up, my sump draining appropriately.

If you’re going to do this install, it really is easy:

1.       Buy the right pump and make sure you have the right size pipe that can connect to your pump!

2.       Unplug your old pump, detach the pipe from the check valve (the connector looking piece in the middle of your discharge pipe) and pull the whole thing out of the sump pit

3.       Attach your pipe to your new pump, put the whole thing in the pit and connect up to your discharge pipe and check valve. Make sure you have connectors for this – they’re rubbery tubes with metal clamps.

4.       Plug in your new pump.

5.       Run water into the pit to make sure it comes on at the right point!

And you’re done! I can't tell you how happy it made me to be done with what should have been such a simple project but, really, it’s the little things in life – like the right sump pump and a dry basement.