Showing posts with label historic preservation. Show all posts

Thursday, March 19, 2015

Just Ask Hollywood

There are few things I love more than lights. Light can help set a scene, a mood and give those in its presence an impression. Just ask Hollywood, lighting matters.

Perhaps that's why I so deeply despised my living room lighting until just this week. 

When we moved in, the light was non-existent. One of the first things I did upon move in was put up a fan.

That dealt with some of the stifling heat (it was about 90 degrees inside at that point) and some of the style issues but didn't go nearly far enough for my taste. 

Still, as long as we didn't have air conditioning, the fan was necessary. 

Once I did put in AC, the fan wasn't leaving simply because I had too many other things on my plate. Just a few months later came new drywall and paint and I found myself wishing for new lighting.  

Funny enough, I got forced into my wish. 


During the drywall installation, my contractor took down two fan blades to cut around the fan (we couldn't get it down!) and put the screws in a piece of tape for later replacement. Sadly, I didn't know that and a small ton of masking tape went into the trash shortly after installation. I'm guessing the tape with the screws was one of those pieces since we never found it.

Without the balance provided from all of the blades, it sounded like a freight train about to fall off my ceiling every time it accidentally got turned on.


Not one to look a gift horse in the mouth, I decided I'd just run over to my favorite salvage shop, pick up a new (to me) fixture, rewire it and hang it. 

I'm sure this will come as a shock, but it wasn't quite that simple. 

I got all the way up to hanging the fixture when we realized that the bracket that holds it to the ceiling had been stolen at some point in the last hundred years. 

We couldn't hang my shiny new light fixture and I was forced to put up an ugly shade fixture that was wrong for my home in so many ways. On the bright side, it did provide light. 

This week, however, I was able to undo the wrongs of my past (or at least these particular wrongs) and hang a period correct light fixture in the living room at Isthmus House! 

My favorite salvage ship came through yet again with a bracket that we rigged a bit to attach the lamp to the ceiling. Then my electrician, who was already coming over to take care of another project, hung it up for me!


The fixture had four matching shades too, so those went right up. I think the chip in one of the shades adds a little character- what do you think? 


I definitely have some work to do, smoothing out that ceiling, but the living room is almost done! I can't wait to show off the final product!

Thursday, March 5, 2015

How to Repair, Reuse and Move a Door to a New Location

I grew up in a home with one and a half baths. Honestly, for a family of four, that was perfectly fine. Turns out, that's not really sufficient for four unrelated people living under one roof. That's a little squishy.

It's not that The Roommates are hard to live with, it's more that it's not quite as kosher to be in the same bathroom with all of the bathroom-y things happening at the same time when you're not immediate family.

That meant, with two new Roommates moving in within the last month, that we needed more than one bathroom - pronto.

We left off in the bathroom upstairs with a shiny "new" vanity that has running water, storage, and lots of counter space - especially when compared with the downstairs pedestal.

Now it was time for yet another door!

Since I know we talked about doors last week (I really do have quite the collection - the original Roommate aids and abets this addiction - I mean, collection - with some regularity), I'll skim over the door a bit for you all.

We had to entirely reframe out the bathroom doorway when we pulled permits to move the wall between the bathroom and bedroom a few inches. The city feels that a second floor bathroom should be accessible so it had to become 32 inches instead of the intended 30 inches I really wanted.

Is it the end of the world? No. Is it a little vexing? Yes, because I couldn't reuse the existing door. That one went into my collection.

Instead, I stole a door from the downstairs living room that divided it from the foyer since I think it was added when Isthmus House was converted from single family to a duplex. Why do I think that? It was signed and dated!


To get the door ready to move upstairs, we had to prep a little. After taking it off the door frame leading into the living room, I pulled off the board covering it up just like the door we exposed in the kitchen. That's when I found the nifty signature above. 


There was also a modern doorknob hole that was both unnecessary and unwanted - large holes are generally frowned upon for bathroom doors.

Filling in a hole in a door is super simple. First, lay the door flat on a work surface. If you're anything like me and a little too lazy to bother getting out your sawhorses, at least protect your floors.


Next, use wood filler to fill the hole - leaving it slightly concave. I used wood weld - a product designed to be a quick filler for wood repairs. You just knead it for a couple of minutes - it smells awful - and then squish it to whatever you need to fill.


It dries really quickly (about an hour) and is rock hard once it does.

After it's all dry, a quick fill with joint compound levels it out.


Since I hate hanging doors with a fiery passion, my contractor took care of that part, complete with egg and dart doorknob and fleur de lis hinges to match the rest of the original doorknob hardware around the house.


So now we have a bathroom door - it even has a lock!

Only one update left before the final reveal! Can't wait!

Thursday, February 19, 2015

The 3-5 Rule

As tax time draws near and I'm itemizing every receipt for Isthmus House (which is still a rental, friends) I'm reminded of the old adage that if you do work in an old home yourself, it'll probably cost you three times more than you thought and take five times as long. Alternatively, you can pay someone five times more than you thought it would cost and it'll take 3 times as long.

Never has this been truer than with the installation of casings.

After the drywall was installed downstairs and I finished so. many. patches., we had pretty walls but they looked patently unfinished.


To fix this, it was time for casings.

I'm obsessed with old woodwork but, sadly, Isthmus House doesn't have a ton of its original trim left. What was left was staying right where it was so I only had two options left: find salvaged trim to match or have trim made to match the existing. Since four and a quarter inch casings weren't coming up on Craigslist, I really only had the option of having trim custom cut.

It's true that custom millwork isn't inexpensive, but it's worth every dime to have cohesive trim throughout the house.

Once all several hundred feet were delivered, I had some painting to do. So. much. painting.


I could paint 5-6 pieces of casing at a time and every piece needed at least 2 coats of paint before they could be installed.


Needless to say, this was a bit of a long process but I got it done within a few days.


Each individual piece had to be cut perfectly to size and pieced together. With the walls being at least a bit wavy, I didn't feel that my carpentry skills were good enough for the perfect copes necessary for this trim installation so I called in my carpenter. That's where the five times as much money part and at least three times as long rule came in.


Each nail hole then had to be filled with a paintable putty, sanded down (I used the finest steel wool), wiped down and then repainted over.


The casings made the rooms look much more complete just in time for our Christmas party.


Now if only I could have baseboards, too...

Thursday, February 12, 2015

Old houses have closets!

Is it possible to only have one project going at a time? Around Isthmus House, the answer would be, unequivocally, no. No, it's not.

It's not that I have a short attention span or that I'm impatient or even that I'm in a rush. I think I continue to work on multiple projects at once because it allows me to see little bits of progress all over my house.

While the upstairs bathroom is in progress, there's been no exception to the rule: multiple projects continue.

Old homes aren't exactly known for their storage capabilities and the House on the Isthmus is no exception there either. When I moved upstairs and into what was once the upstairs living room, there was no closet. Heck, there was no wall between the "living room" and the "kitchen" so really a closet would have been a bit too big a dream at that point.

With Isthmus House moving firmly back to being a single family home, however, it was time to add some storage.

To get started, I needed to figure out where I could even put openings for doors without massive amounts of demo. There were lots and lots of measurements and lots and lots of tape involved.

Hint: this isn't exactly where this door ended up
Eventually, though, I was able to fit in a doorway - taped out, of course, and make the closets decent sized. For my old room, the only way to add a closet was to take away from the nook in the master.


As you can see, that meant closing off the master closet (pantry?) door (that's the door on the left in the photo). That's a story for another day. Trust me, it deserves its own post.

To do that, we removed the door, casings and jambs from the opening before adding 2x4s for screwing in the drywall.


After finishing that bit of framing, we demo'd part of the archway turned wall for the opening into the closet from the bedroom.

The framing here is left over from when we initially installed drywall to separate the living room from the kitchen

 Once it was fully opened, we were able to build the back wall of the closet.


The framing went up pretty quickly (it's about 6 pieces of wood)  and we were able to finish it up with additional framing around the doorway for drywall installation.


We did a quick rinse and repeat for what I affectionately call the blue room - framing it out with 2 by 4s. If you happen to be a builder and notice there's a missing piece, we did add it before drywalling!


With the framing complete, my drywallers could come on in. Fast as always, they managed to mud and tape everything while I was away on a trip. 


And then there were closets - decent sized, even, in an old house! Only one problem... you didn't want to actually put anything in them. Right?

Love the House on the Isthmus? Like our Facebook page!

Thursday, December 19, 2013

It was just covered up!

Let’s start this week with one simple fact: The House on the Isthmus is always surprising me which is saying rather a lot considering the number of surprises we’ve ushered in the last six months. Now that we’ve confirmed that, brace yourself for its latest surprise.

Now we can proceed with the story leading up to it.

My bedroom door installation was no easy feat. In fact, a detail I left out of the story from a couple of weeks ago was that I actually intended for it to swing left and into the corner of my bedroom. That ended up not being possible because the floors aren’t level and it would ground out when we went to open it.

To get started on the original plan, I had to remove the transition piece from between the hallway and my bedroom. That also meant removing just a little bit of the flooring in the hallway so that we could drop the door into its desired position.
The floating floor pretty much untouched
A couple of weeks ago, the City of Madison sent me a note letting me know that they took exception to my Bagster being in the front yard and that it had to go. Since it wasn’t full and I don’t want to upset the City, I decided to pull up the old flooring (since I now knew there was hardwood underneath it all) to fill the Bagster with whatever pieces I couldn’t salvage before the deadline for it to be taken away. When we hung the door, I pulled only a couple of tiles before moving on to other projects around the house.
It’s not like I expected to just pull up the existing floating cork floor (that I think was one of the lipstick on a pig projects completed right before I bought the house) and magically find nice hardwood floors. I hoped, maybe, but I didn’t see myself getting as lucky as in The NewRoommate’s room twice… and I didn’t.

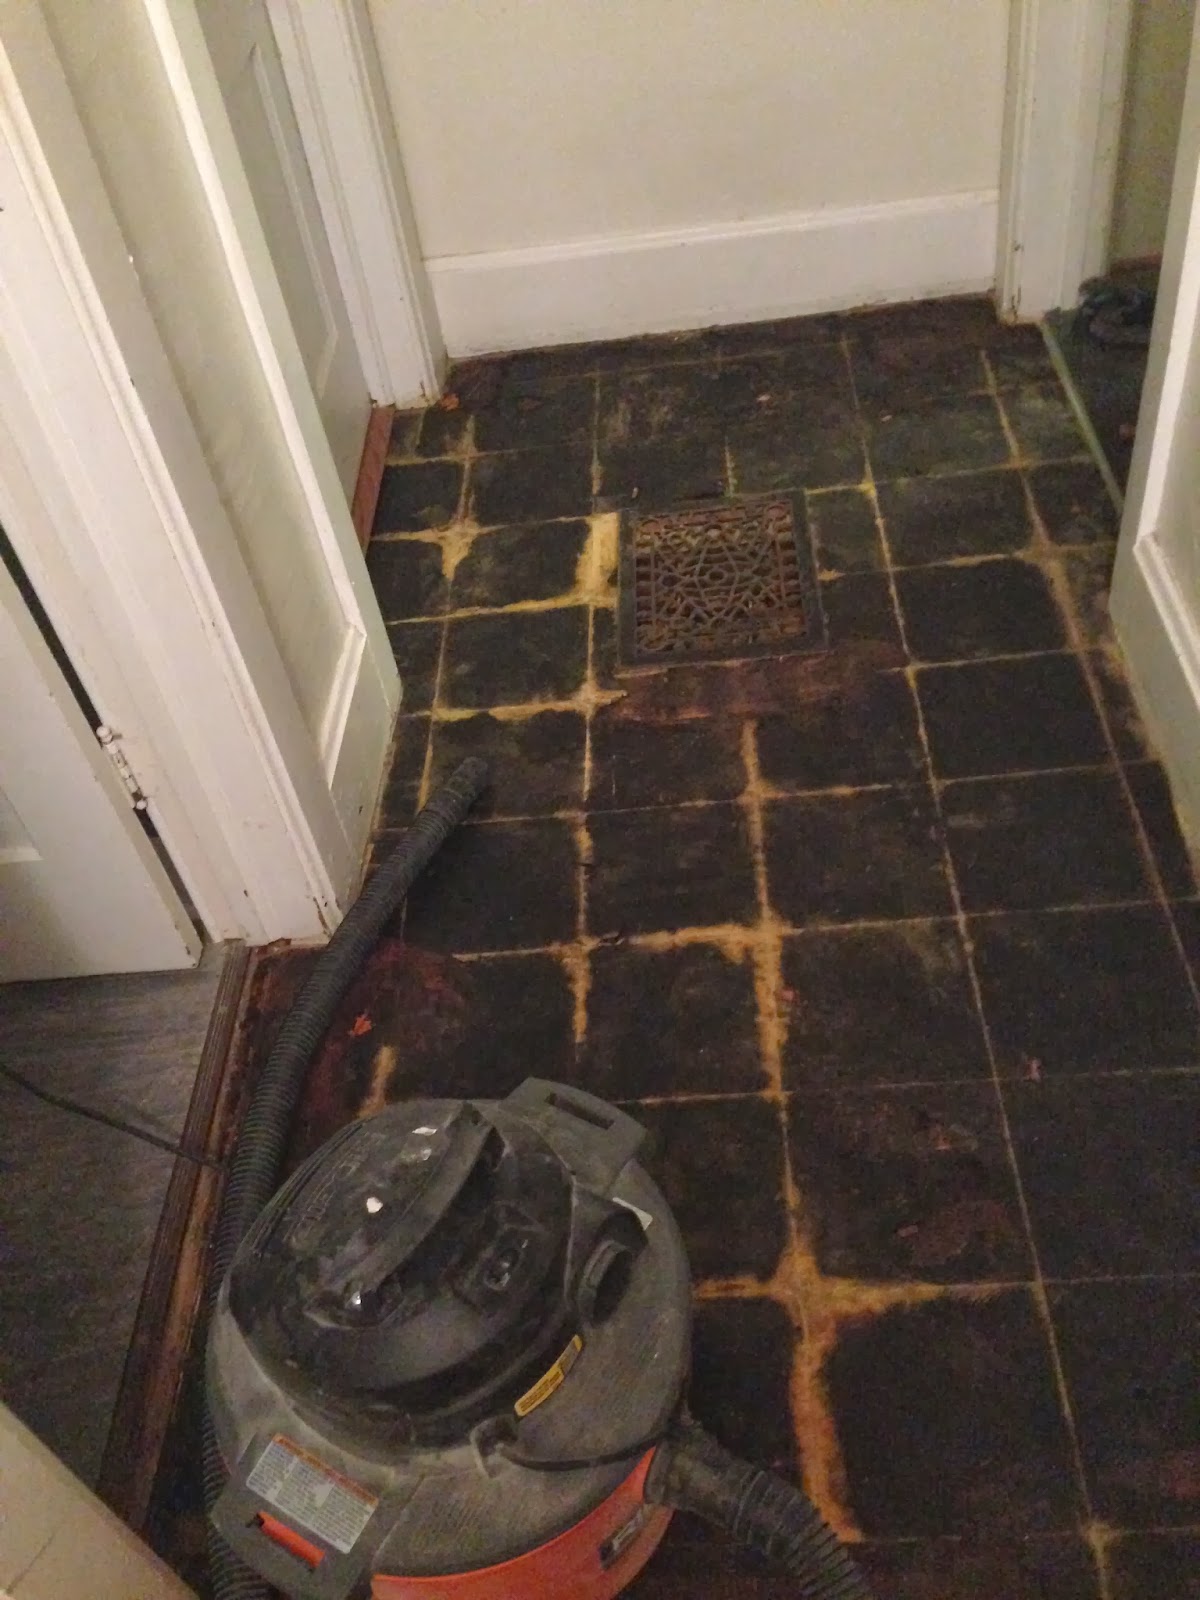
Underneath the floating floor (so called because it’s not glued or nailed down to anything, it just locks to itself) was a floor pad (not interesting) and under that gem was linoleum tile. Not vinyl peel and stick, mind you. It was linoleum. Now, linoleum is actually a great, period correct floor covering material in certain forms but this was more like the 1960s and didn’t quite fit one of those forms.

The floor pad - yep, that's duct tape!


Trust me, keep reading, it’s about to get good.

Up came the floating floor in about ten minutes and I managed to save six of the 12-15 boards that compiled the hallway floor to donate later. Best demo project ever.

Then up came the pad and there it was, my latest surprise from Isthmus House: a grate set into the floor.


After some diligent scraping of the tar-paper-like adhesive with my very glamorous floor scraper (a razor blade on a paddle, essentially) everything that could go in the aforementioned Bagster did.


Once everything was up that was going to come up, I baby-powdered the floor to make it less tacky and wiped it all down.

I realize it’s not done yet, but doesn’t it look better at least? I can't wait to get them fully refinished!

Thursday, July 25, 2013

The Continuing Saga of the Wood Paneled Shower

I don’t know too many people who have bothered to refinish a bathtub. I’m one of the few, slightly crazy people who have tried, apparently in my attempt to rid the bathroom of the wood-paneled shower. Mission accomplished!


I got the idea to try to reglaze a five-foot long cast iron claw foot tub we found on Craigslist from, yet again, Nicole Curtis on Rehab Addict. In addition to seeing her repaint many a clawfoot exterior, she also refinished a pedestal sink during her restoration of the incredible Minnehaha House and it seemed like a good way to stay on budget in mine.

The tub was in decent shape but super dull on the inside and a flat tan color on the outside when I got it. Considering it was made in 1921 though, I’m impressed!

I started off by wire brushing off any chipping paint and spray painting the outside a flat black. It took me about 2 cans to get the full coverage needed.  The paint is still wet in this picture and it looks so much better!

A few days later, The Roommate and I noticed that there was a weird, white film splashed all over both the pathway in the backyard as well as one side of the tub. We’re pretty sure some dirty water from one of the other projects in the house got splashed over there. So I wiped the tub down and repainted the affected areas.

Following the dirty-water incident, I decided that I wasn’t going to refinish the tub just to have a bug land in it or a leaf fall on it while it was wet, ruining the finish. The Roommate and my friend Todd helped me get it into the porch.

While The Roommate was out, I read the reglazing instructions cover to cover no fewer than 4 times. I scrubbed the tub with the solution provided, rinsed it and fully dried it 3 times. Then I went to check the instructions again for the next steps. They clearly stated that I was actually supposed to scrub, rinse, dry, steel wool in a small, circular pattern, rinse and dry again then repeat that 3 times. Rather a large mistake in 95 degree heat and Isthmus House isn’t air conditioned. I’ll let you extrapolate the outcomes.
Here's how it looked just washed 3 times:

And how it looked when steel wooled:


Since I’d already done 3 rounds of scrubbing, I only did 2 rounds of the full, steel-wool-included scrub-a-dub that night. I waited until The Roommate was out again a few nights later to resume the project, starting with another round of scrubbing and rinsing. After that was all done, I had to make sure that the surface is clean of any steel wool residue. That is easier said than done with 15-20 square feet of surface and it took me somewhere around 7-10 rounds of rinsing and drying before I was convinced it was ready for the epoxy. This is definitely one of those jobs to be positive you’ve done all you can to get the prep right or the epoxy doesn’t adhere properly - it probably took me about 4 hours start to finish.

Let me tell you, it's really, really clean in this picture!


After I taped off every bit of the fixtures, I started the spray-painting around 10pm and the first coat took less than 15 minutes. It’s supposed to look a little patchy and it doesn’t look a thing like porcelain when you start. Despite following every instruction to the letter, my spray can spit paint like crazy and I had drips that I was running over with my paint brush constantly.
While I was painting, it was spitting so much lacquer my fingers got stuck to the nozzle and it came off when I tried to let go of the can. This is how they looked post lacquer thinner scrubbing: 

I got a decent first coat down and waited the recommended 15 minutes before applying the second coat (if you wait more than 90 minutes, you have to wait 72 hours).

The second can also spit epoxy drops everywhere and, again, I brushed them through with my paintbrush. Eventually, I was able to get long enough drip-less periods that the finish looked clean, smooth and dripless all the way through. I had opened almost every window on the first floor, but those fumes are intense and my mother got a good laugh at my accidentally-high-as-a-kite narrative via text that night and my little sister was very sad she missed it.

I couldn’t have been happier with how the tub looked and went to bed happy. The next morning, I went to check on the tub and the porch doors I’d been wondering how I’d get off fell off the hinges and onto the tub edge, gouging the not-yet-fully-set epoxy. The Roommate came to check on me having heard me yelling across the house.

Not to worry, there were already a few chips yet to fix and those got added to the agenda and repaired following the 72-hour mandatory dry time (I gave it more like 5 days due to travel). The total cost for all of the supplies and the tub itself came to about $450 - not bad! Here’s the final product, a beautiful, gleaming, period-correct claw foot tub that I love and can’t wait to get installed! What do you think?!

Thursday, July 11, 2013

The first buckets of color

Over 4th of July weekend, I made a trip back to my beloved Detroit for paint. Well, technically, I was really there for my family, but paint was part of the weekend.

About an hour from my parents’ house is a town called Jackson. Jackson is home to the closest Seven Paints store by far and Seven Paints is pretty much the only place that carries California Paints. For comparison purposes, the closest one to Isthmus House is 144 miles away in Oswego, Illinois.

My mother and I took a field trip over to the store and spent about an hour and a half choosing nearly all of the colors for the first floor of the house. This is particularly challenging because every room will be visible from every other room when I reopen the foyer to the kitchen. That means all of the colors have to transition nicely but also define the spaces.
We definitely got enough paint to give me something to do for a while!


The foyer is going to be in the beautiful soft Sleeper’s Entry with a Mid-Century White ceiling (along with all of the ceilings in the house). We’re going to be reopening the vaulted ceiling in the foyer since it’s poorly drywalled and paneled over. Really, who does that?

From there, I’ll transition into the living room once it’s drywalled over in a pretty Clamshell grey with Ivory Cottage in the porch. The buttery Ivory Cottage will need go directly over the paneling once it’s sanded – don’t worry, there will be pictures for the whole thing!

The dining room will be a soft sage color called Sea Oats before we reach the kitchen in a beautiful Garden Terrace.

So, when we’re done, the transition between the rooms will look like this (a little lighter and brighter maybe, depending on your computer’s graphic properties):

With all Relative White trim, the house should go back to looking clean and pretty with just a few hundred dollars and some time. Photos to follow as we finish room by room!

Update: These plans changed dramatically when I opened a can and was all ready to paint and it was way off from the desired colors a while later. I can't say whether or not that's typical but we made some last minute changes at Isthmus House!

Monday, June 24, 2013

A twist in the story - two units become one

The family has come and is on their way back to Detroit and the Isthmus House is looking better! I didn’t have a spare minute to write on here so thanks for your patience and get ready for a shower of posts this week (small pun unintended).
The bathroom is still in progress. I know, it’s a little bit of a teaser right now, but I promise it’ll be worth it. That’s what I keep telling myself, anyway!
Something that was done this week though is… drumroll please… the downstairs living room/porch!
Now, if you’ve been reading to this point, you know that the porch was my bedroom.  That's changed and I’m making Isthmus House a single-family home now instead of in a year. If you’re wondering why, well, I have plenty of reasons.
#1 - I’m an introvert (true story!) who likes just a little of her own space – and who doesn’t like a little more living space for everyone?
#2 - the cost to make the porch private enough for a bedroom was roughly equivalent to a month’s rent from the upstairs unit. Broken down over the year, it wasn’t a big difference financially to just rent out the remaining bedroom instead.
#3 - We’re going to have to renovate the kitchen in the next 6 months to a year and it’s a major hassle to not have a kitchen – and I doubt The Roommate would appreciate that much. This way, we can use the upstairs kitchen during that time!
There are other reasons, but I won’t bore you with them all. Getting back to the point, I moved upstairs so the porch is now open except for my box spring that was not going up those stairs without being sawed in half. That might be a project for this weekend but we’ll see.
With the shared space now being more important, the living room also got a face lift. First, my little sister, Laura, dad and I replaced the ceiling fan with minimal cursing and throwing of things like brackets (I’ll take credit for both). Fancy, no? It even has a remote!
 My dad pretty much finished the rest himself. He’s incredible – especially with joint compound, a putty knife and some paint – and he really wanted the living room done this weekend.
While the extra light switch, vent and thermostat where nice, open doorways with casings belonged were problematic, the bigger issue was the severe damage. As I suspected in my last post where I pulled off the paneling, the damage from the paneling or that it covered on the walls was pretty bad.
Around a vent, we found smoke damage. That's not surprising since my neighbors told me there was a dryer fire about 18 months ago but it would have been good to know before I signed on the dotted line. The original baseboards were apparently ripped off, taking large amounts of plaster with them and there were large cracks elsewhere.

On the bright side, we also figured out when the paneling was put up – somewhere around November 1963 – the oldest piece of mail we found behind it! I loved getting a little glimpse into some of what Isthmus House held before this.

After about twelve hours of spackling, taping, patching and sanding he got them to the point where they could be painted for the time being. It’s not quite irreparable - it'll just take lots of time and sanding - but my dad took it most of the way and they certainly look good enough for now. Check out the new “delicate pearl” color. It’s so much lighter and brighter than the paneling and navy and it’s still just temporary!

Isthmus House is coming along – slowly but surely – and my family’s trip was a super productive, much appreciated step along the way! Stay tuned for more on what the family accomplished while they were here!