Showing posts with label period correct. Show all posts

Thursday, March 19, 2015

Just Ask Hollywood

There are few things I love more than lights. Light can help set a scene, a mood and give those in its presence an impression. Just ask Hollywood, lighting matters.

Perhaps that's why I so deeply despised my living room lighting until just this week. 

When we moved in, the light was non-existent. One of the first things I did upon move in was put up a fan.

That dealt with some of the stifling heat (it was about 90 degrees inside at that point) and some of the style issues but didn't go nearly far enough for my taste. 

Still, as long as we didn't have air conditioning, the fan was necessary. 

Once I did put in AC, the fan wasn't leaving simply because I had too many other things on my plate. Just a few months later came new drywall and paint and I found myself wishing for new lighting.  

Funny enough, I got forced into my wish. 


During the drywall installation, my contractor took down two fan blades to cut around the fan (we couldn't get it down!) and put the screws in a piece of tape for later replacement. Sadly, I didn't know that and a small ton of masking tape went into the trash shortly after installation. I'm guessing the tape with the screws was one of those pieces since we never found it.

Without the balance provided from all of the blades, it sounded like a freight train about to fall off my ceiling every time it accidentally got turned on.


Not one to look a gift horse in the mouth, I decided I'd just run over to my favorite salvage shop, pick up a new (to me) fixture, rewire it and hang it. 

I'm sure this will come as a shock, but it wasn't quite that simple. 

I got all the way up to hanging the fixture when we realized that the bracket that holds it to the ceiling had been stolen at some point in the last hundred years. 

We couldn't hang my shiny new light fixture and I was forced to put up an ugly shade fixture that was wrong for my home in so many ways. On the bright side, it did provide light. 

This week, however, I was able to undo the wrongs of my past (or at least these particular wrongs) and hang a period correct light fixture in the living room at Isthmus House! 

My favorite salvage ship came through yet again with a bracket that we rigged a bit to attach the lamp to the ceiling. Then my electrician, who was already coming over to take care of another project, hung it up for me!


The fixture had four matching shades too, so those went right up. I think the chip in one of the shades adds a little character- what do you think? 


I definitely have some work to do, smoothing out that ceiling, but the living room is almost done! I can't wait to show off the final product!

Thursday, February 19, 2015

The 3-5 Rule

As tax time draws near and I'm itemizing every receipt for Isthmus House (which is still a rental, friends) I'm reminded of the old adage that if you do work in an old home yourself, it'll probably cost you three times more than you thought and take five times as long. Alternatively, you can pay someone five times more than you thought it would cost and it'll take 3 times as long.

Never has this been truer than with the installation of casings.

After the drywall was installed downstairs and I finished so. many. patches., we had pretty walls but they looked patently unfinished.


To fix this, it was time for casings.

I'm obsessed with old woodwork but, sadly, Isthmus House doesn't have a ton of its original trim left. What was left was staying right where it was so I only had two options left: find salvaged trim to match or have trim made to match the existing. Since four and a quarter inch casings weren't coming up on Craigslist, I really only had the option of having trim custom cut.

It's true that custom millwork isn't inexpensive, but it's worth every dime to have cohesive trim throughout the house.

Once all several hundred feet were delivered, I had some painting to do. So. much. painting.


I could paint 5-6 pieces of casing at a time and every piece needed at least 2 coats of paint before they could be installed.


Needless to say, this was a bit of a long process but I got it done within a few days.


Each individual piece had to be cut perfectly to size and pieced together. With the walls being at least a bit wavy, I didn't feel that my carpentry skills were good enough for the perfect copes necessary for this trim installation so I called in my carpenter. That's where the five times as much money part and at least three times as long rule came in.


Each nail hole then had to be filled with a paintable putty, sanded down (I used the finest steel wool), wiped down and then repainted over.


The casings made the rooms look much more complete just in time for our Christmas party.


Now if only I could have baseboards, too...

Thursday, December 19, 2013

It was just covered up!

Let’s start this week with one simple fact: The House on the Isthmus is always surprising me which is saying rather a lot considering the number of surprises we’ve ushered in the last six months. Now that we’ve confirmed that, brace yourself for its latest surprise.

Now we can proceed with the story leading up to it.

My bedroom door installation was no easy feat. In fact, a detail I left out of the story from a couple of weeks ago was that I actually intended for it to swing left and into the corner of my bedroom. That ended up not being possible because the floors aren’t level and it would ground out when we went to open it.

To get started on the original plan, I had to remove the transition piece from between the hallway and my bedroom. That also meant removing just a little bit of the flooring in the hallway so that we could drop the door into its desired position.
The floating floor pretty much untouched
A couple of weeks ago, the City of Madison sent me a note letting me know that they took exception to my Bagster being in the front yard and that it had to go. Since it wasn’t full and I don’t want to upset the City, I decided to pull up the old flooring (since I now knew there was hardwood underneath it all) to fill the Bagster with whatever pieces I couldn’t salvage before the deadline for it to be taken away. When we hung the door, I pulled only a couple of tiles before moving on to other projects around the house.
It’s not like I expected to just pull up the existing floating cork floor (that I think was one of the lipstick on a pig projects completed right before I bought the house) and magically find nice hardwood floors. I hoped, maybe, but I didn’t see myself getting as lucky as in The NewRoommate’s room twice… and I didn’t.

Underneath the floating floor (so called because it’s not glued or nailed down to anything, it just locks to itself) was a floor pad (not interesting) and under that gem was linoleum tile. Not vinyl peel and stick, mind you. It was linoleum. Now, linoleum is actually a great, period correct floor covering material in certain forms but this was more like the 1960s and didn’t quite fit one of those forms.

The floor pad - yep, that's duct tape!


Trust me, keep reading, it’s about to get good.

Up came the floating floor in about ten minutes and I managed to save six of the 12-15 boards that compiled the hallway floor to donate later. Best demo project ever.

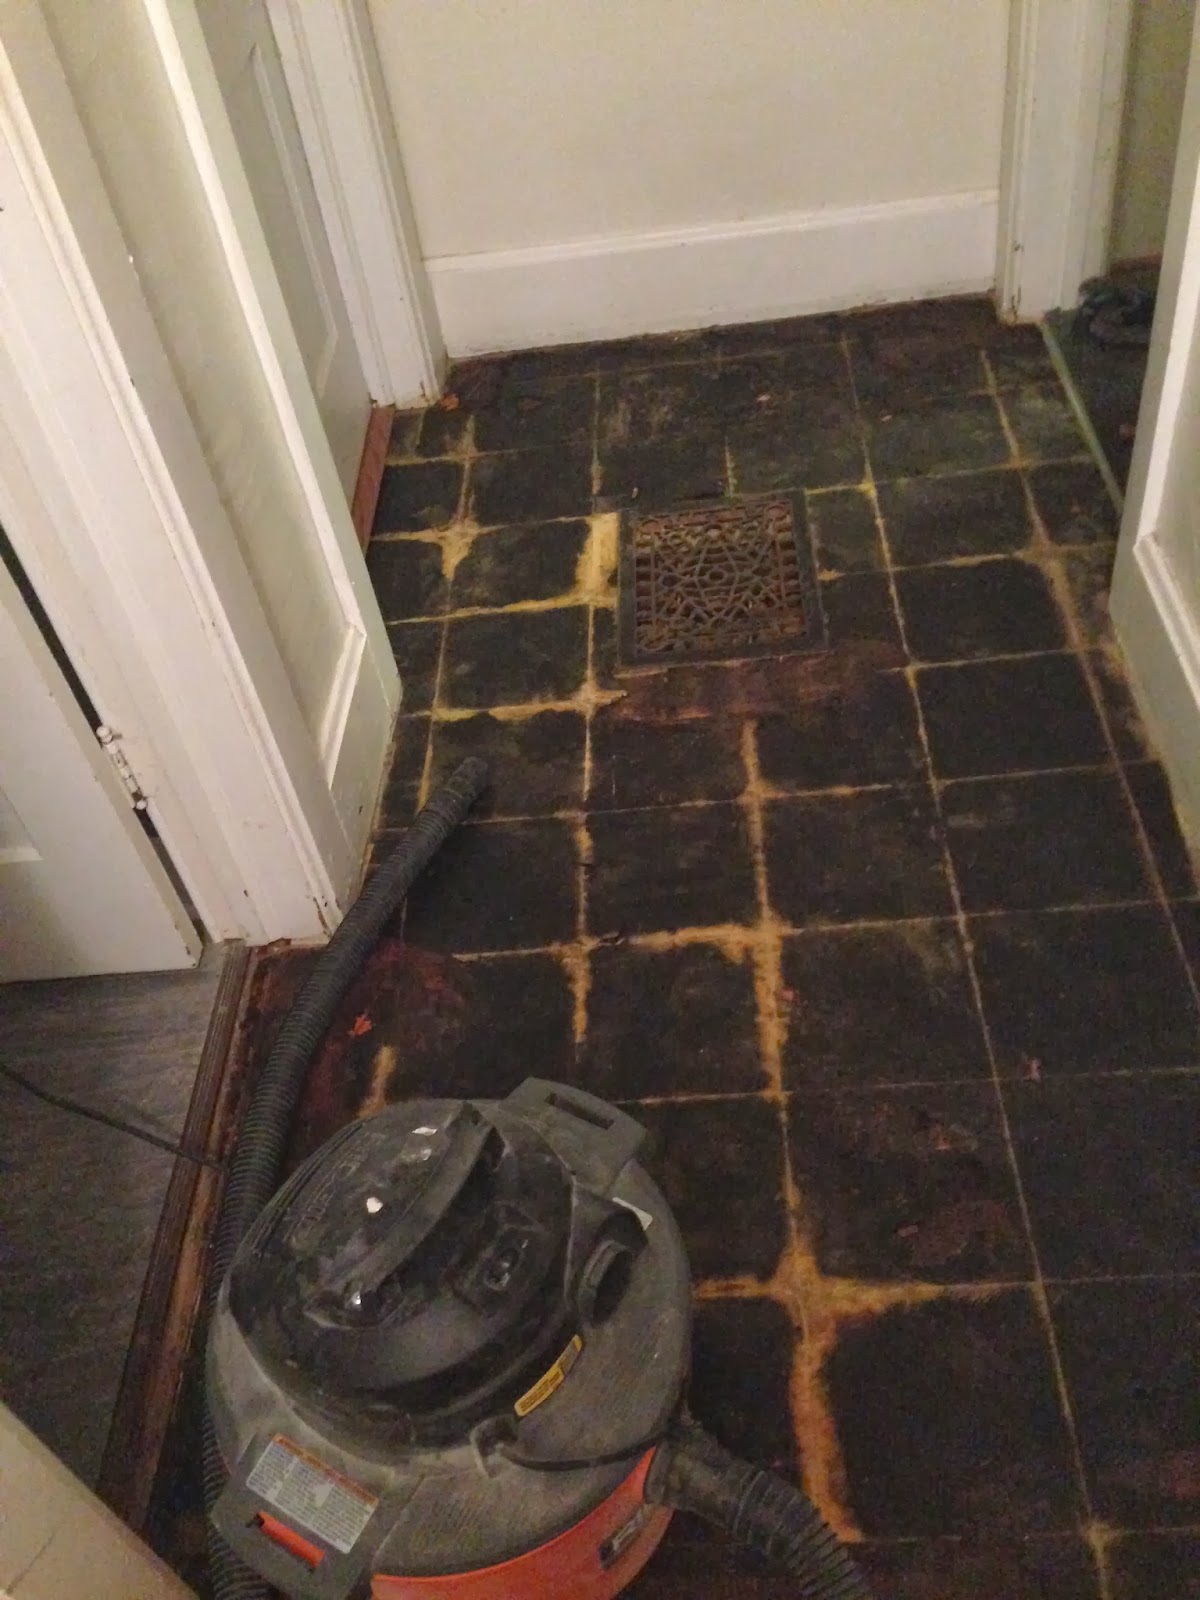
Then up came the pad and there it was, my latest surprise from Isthmus House: a grate set into the floor.


After some diligent scraping of the tar-paper-like adhesive with my very glamorous floor scraper (a razor blade on a paddle, essentially) everything that could go in the aforementioned Bagster did.


Once everything was up that was going to come up, I baby-powdered the floor to make it less tacky and wiped it all down.

I realize it’s not done yet, but doesn’t it look better at least? I can't wait to get them fully refinished!

Thursday, July 11, 2013

The first buckets of color

Over 4th of July weekend, I made a trip back to my beloved Detroit for paint. Well, technically, I was really there for my family, but paint was part of the weekend.

About an hour from my parents’ house is a town called Jackson. Jackson is home to the closest Seven Paints store by far and Seven Paints is pretty much the only place that carries California Paints. For comparison purposes, the closest one to Isthmus House is 144 miles away in Oswego, Illinois.

My mother and I took a field trip over to the store and spent about an hour and a half choosing nearly all of the colors for the first floor of the house. This is particularly challenging because every room will be visible from every other room when I reopen the foyer to the kitchen. That means all of the colors have to transition nicely but also define the spaces.
We definitely got enough paint to give me something to do for a while!


The foyer is going to be in the beautiful soft Sleeper’s Entry with a Mid-Century White ceiling (along with all of the ceilings in the house). We’re going to be reopening the vaulted ceiling in the foyer since it’s poorly drywalled and paneled over. Really, who does that?

From there, I’ll transition into the living room once it’s drywalled over in a pretty Clamshell grey with Ivory Cottage in the porch. The buttery Ivory Cottage will need go directly over the paneling once it’s sanded – don’t worry, there will be pictures for the whole thing!

The dining room will be a soft sage color called Sea Oats before we reach the kitchen in a beautiful Garden Terrace.

So, when we’re done, the transition between the rooms will look like this (a little lighter and brighter maybe, depending on your computer’s graphic properties):

With all Relative White trim, the house should go back to looking clean and pretty with just a few hundred dollars and some time. Photos to follow as we finish room by room!

Update: These plans changed dramatically when I opened a can and was all ready to paint and it was way off from the desired colors a while later. I can't say whether or not that's typical but we made some last minute changes at Isthmus House!

Wednesday, June 26, 2013

The Saga of the Wood Paneled Shower - Part II


In The Saga of the Wood Paneled Shower - Part I, out came the paneling in the shower, the walls, etc. Now, the downstairs bathroom is fully gutted minus the sink. That means the tub, mold, walls behind the shower, fixtures, door, hardwood floors, everything. Here's how it went down.

First, the mold remediators came in. They taped and plastic’d everything up and sprayed, vacuumed and sealed all of the mold into submission, ensuring it won’t return. I can’t say enough good things about their work, even if it did cost me $1000!

I got back to work once it was clear and I called in a contractor to hang the cement board and greenboard in the bathroom since the walls weren't plumb. Cement board goes behind things like shower enclosures and is “superior mold protection.” The greenboard (pretty much treated drywall) goes above the shower enclosure and is mold resistant. While I can’t say that I love the work the contractor did, the good part is that I then had insulated exterior walls and we managed to save the plaster in the rest of the room so I can just paint it.

Once the walls were up, my sister and I also worked on pulling the rather un-level hardwood floor out in the hopes that I can use some of the ¾ inch spruce or hard longboard pine to patch some of the floors in the rest of the house. They really don’t have hardwood like that anymore – it took over an hour and several specialized blades in an oscillating saw to get the remnants out flush to the wall. There was smoke in the air from how hard the boards were on the saw blades.


My dad mudded, taped and sanded down the seams (see my last post for more about how he’s a magician with those supplies), and managed to get us a surface we could lay tile on that would actually stick.

After that was all finished up, Laura and I waterproof membrane’d the heck out of those walls using a product called RedGard. You brush it on hot Barbie pink, it dries to a bright red and it blocks water. Have I mentioned that I never want to see a hint of mold in my house again?


So, that was the extended demo of the bathroom all the way down to the studs and the subfloor. Up next – the rebuild!

Monday, June 24, 2013

A twist in the story - two units become one

The family has come and is on their way back to Detroit and the Isthmus House is looking better! I didn’t have a spare minute to write on here so thanks for your patience and get ready for a shower of posts this week (small pun unintended).
The bathroom is still in progress. I know, it’s a little bit of a teaser right now, but I promise it’ll be worth it. That’s what I keep telling myself, anyway!
Something that was done this week though is… drumroll please… the downstairs living room/porch!
Now, if you’ve been reading to this point, you know that the porch was my bedroom.  That's changed and I’m making Isthmus House a single-family home now instead of in a year. If you’re wondering why, well, I have plenty of reasons.
#1 - I’m an introvert (true story!) who likes just a little of her own space – and who doesn’t like a little more living space for everyone?
#2 - the cost to make the porch private enough for a bedroom was roughly equivalent to a month’s rent from the upstairs unit. Broken down over the year, it wasn’t a big difference financially to just rent out the remaining bedroom instead.
#3 - We’re going to have to renovate the kitchen in the next 6 months to a year and it’s a major hassle to not have a kitchen – and I doubt The Roommate would appreciate that much. This way, we can use the upstairs kitchen during that time!
There are other reasons, but I won’t bore you with them all. Getting back to the point, I moved upstairs so the porch is now open except for my box spring that was not going up those stairs without being sawed in half. That might be a project for this weekend but we’ll see.
With the shared space now being more important, the living room also got a face lift. First, my little sister, Laura, dad and I replaced the ceiling fan with minimal cursing and throwing of things like brackets (I’ll take credit for both). Fancy, no? It even has a remote!
 My dad pretty much finished the rest himself. He’s incredible – especially with joint compound, a putty knife and some paint – and he really wanted the living room done this weekend.
While the extra light switch, vent and thermostat where nice, open doorways with casings belonged were problematic, the bigger issue was the severe damage. As I suspected in my last post where I pulled off the paneling, the damage from the paneling or that it covered on the walls was pretty bad.
Around a vent, we found smoke damage. That's not surprising since my neighbors told me there was a dryer fire about 18 months ago but it would have been good to know before I signed on the dotted line. The original baseboards were apparently ripped off, taking large amounts of plaster with them and there were large cracks elsewhere.

On the bright side, we also figured out when the paneling was put up – somewhere around November 1963 – the oldest piece of mail we found behind it! I loved getting a little glimpse into some of what Isthmus House held before this.

After about twelve hours of spackling, taping, patching and sanding he got them to the point where they could be painted for the time being. It’s not quite irreparable - it'll just take lots of time and sanding - but my dad took it most of the way and they certainly look good enough for now. Check out the new “delicate pearl” color. It’s so much lighter and brighter than the paneling and navy and it’s still just temporary!

Isthmus House is coming along – slowly but surely – and my family’s trip was a super productive, much appreciated step along the way! Stay tuned for more on what the family accomplished while they were here!

Wednesday, June 19, 2013

Off with the walls! Or at least the paneling...

As many of you know from our guest blogger (Mom, aka Sita) on Sunday, my family is on their way into town to give me a hand around the house so I'm taking the rest of this week off starting today. Since my circular saw decided not to work as soon as I started the day's initial project, I began pulling the paneling off the walls of Isthmus House's downstairs living room instead. More on the downstairs bathroom tomorrow!

To be fair, the paneling in the living room wasn’t dreadful. It’s just dark in a room that only has one small window. Here’s what it looked like before I got started.


The wood was pretty easy to pull since it was just nailed in to wood slats attached to the plaster. I tried to save as many pieces with both the tongue and groove as possible but only salvaged a few. Behind the paneling was dust. Not mold! But, holy cow, a lot of dust.

Interestingly, it looks like the top portion of the wall was white at one point, then lime green, then white again and now, of course, navy blue. I have to wonder how it did with the lime but I suppose it would have been lighter and brighter than navy. The bottom color is a kind of pinky beige.


I vacuumed as much of the dust off as I could, but the room will definitely need a good scrubbing in the next couple of days before anything else happens.

Here’s what I’ve got now that the paneling’s down. You can see exactly where the baseboards used to be (the dark area). I wonder if they were ever painted.


Since the family's around, it seems like a good time to consider adding beadboard or a panel wainscoting all the way around the room in white – what color do you think the top portion should be? Leave me a comment - we're probably going paint shopping tomorrow!

Friday, June 14, 2013

A spoonful of color... or a bucket works, too

Today is a day to think about paint. Not that the Isthmus House is quite ready for it, but it’s still nice to think about and it’s good to plan ahead (see yesterday’s post about paneled showers for more on planning).

I was home sick today and spent a fair amount of time taking in the wall colors around me. Currently, the Isthmus House has a dark navy color in the downstairs living room, The Roommate’s terra cotta bedroom, a very taupe downstairs kitchen and that’s about it.


The Isthmus House is being restored, which means that historically correct colors circa 1910 are a must. What’s the point in hunting down 100 year old doors or patching in hardwood floors if I’m not going to bother getting the paint right?

There’s a sad misconception in pop culture that colors weren’t prevalent in older homes until the “painted ladies” of the late Victorian era. Only in that last several years have “paint historians” (no, not kidding) looked more at the makeup of old paints to determine what colors used to be instead of the faded, broken down versions that were being referenced in paint chips.

This mini-history lesson brings me to my point. While it may be true that the Victorians didn’t even like pink, they didn’t live with only grey and taupe either. I’m sad that so many paint companies (including Valspar and Benjamin Moore, in my opinion) only have muted, sad colors in their “historical paint” collections as a remaining side-effect of early (1920s Williamsburg, for example) archaeological paint efforts.

So, I’ve decided that I’m going with California Paints. They’ve done the research and have collaborated with Historic New England to come up with Historic Colors of America and 20th Century Colors of America, a line running from deep reds to bright blues to rich purples and lots of colors in between. Truth be told, I’m probably choosing them in large part because they have the colors I want to paint the Isthmus House too.

Now, who wants to help me pick the colors?! I’m loving the Garden Terrace, Seascape Jade and Concord Bloom line under the Arts and Crafts category of the 20th Century Colors (link above). Looks like the Isthmus House is about to get a little more color in it! Tell me which colors you like best!

Thursday, June 13, 2013

The Saga of the Wood Paneled Shower - Part I

I love Rehab Addict, the show on DIY Network (and Thursday nights on HGTV) that details Designer/Real Estate Agent/Restoration Expert Nicole Curtis’s journeys through restoring houses like mine to what they once were.  


To get to the good parts though, you’ve got to get through the rougher ones. In my case, that means demoing the vast majority of a bathroom. It turns out that isn’t nearly as fun or therapeutic as it looks on TV.


Let’s start with how this bathroom started when I bought the Isthmus House.

In my opinion, the worst of it was the wood paneling in the shower… and on the walls… and on the makeshift wall and “seat” between the shower and the toilet. And no exhaust fan. Did I mention that among all that wood there was also a window in the shower? Or that the 60s ceiling tiles (please, don’t be asbestos), trim and grass cloth wallpaper were still intact?

This is how it looked when I started. You can see a bit of the paneling under the window on the left.


I started by trying to pry off the paneling from inside the shower because I assumed there was mold immediately behind it. Turns out, the wood paneling was new and had been recently nailed and glued down. To get the paneling off, I had to chisel between the panels to get a claw-hold before prying.

After prying off the paneling, I was pleasantly surprised that there was new cement board underneath and no apparent signs of mold or mildew despite it being obvious no one had even tried to waterproof. Reread my “before” paragraph above and you’ll understand my surprise. Feeling relieved, I took down some plaster above the window to see if any moisture had gotten around the edges and into the walls.
Here’s a pic of the newly exposed lath by the window in the shower. You can see the edges of the new cement board underneath as well as some of the paneling. Both were silicone'd in. 


I had to go on a business trip the next day so I let it go for a week or so while I worked on some other things around the house before digging back in.

This past Sunday, when The Roommate was gone for a bit, I decided that the rest of the bathroom should come down and out while I could make plenty of noise. Back on went the respirator, safety glasses and gloves and out came the plastic to protect the rest of the room along with my claw, hammer and screwdriver.

I got through some more plaster and taking down the towel racks when I realized that the pieces of paneling I was removing along the wall adjacent to the shower were coming out awfully easily and seemed kind of soft. If you just said “oh, no,” you guessed it. Water had been seeping from the edge of the tub into the wall and wicking along the drywall that had been installed creating mold and plenty of it.

Since I was wearing a mold-grade respirator and was well-protected (and The Roommate wasn’t coming home for a while), I kept pulling. And pulling and pulling. There was mold under the drywall and that brand new cement board and well embedded in the wall and lath. It went all the way into the beams and through the wall to the lath on the kitchen side.
After assessing the damage and coming to the conclusion that this had seemingly been covered up by whoever had done the work, I called a local company and asked them to come out for a consultation for remediation services before I could leave on yet another business trip. While they made it out for the consult, I learned that the middle of June is the busiest time of year for them so I’ll be waiting until next week for them to come out to take care of this mess to the tune of a cool thousand bucks. For reference purposes, that’s about equal to the entire tile budget that includes a marble basket weave floor.

I figure there are a couple of lessons learned here and a couple of reminders worth noting.

1.   It is not okay for anyone to cover up things that can affect a future resident’s health. This includes black mold and potential structural damage.

2.   If at first you don’t see mold when you expect it, keep looking until all potentially affected surfaces are checked.

3.   It doesn’t matter if building code says you don’t need an exhaust fan in the bathroom because there’s a window. No one opens a bathroom window after a shower in January in Wisconsin. Install an exhaust fan – and don’t vent it to your attic.

4.   Your contingency fund matters. I put aside a little more than 20% contingency in the budget for this bathroom for when issues came up. They did and I’m glad to have “planned” for the just-in-case.
5.   You never know exactly what's behind your walls until you open them. I found this little surprise! Looks like the workers might have left it in the 40s or so!


This is the part where the road bumps happen but we get through them so that y’all can see my new bathroom within the next few weeks. More on the saga of the soon-to-be-clean bathroom to come!

Turning the key and definitely not turnkey


Another day has dawned and it seems pertinent to talk about locks.


Locks are a funny thing. In the great State of Wisconsin, you have to have an automatically locking front door if you have a multi-dwelling home. While that might not sound particularly troubling, consider how many deadbolts you’ve encountered that lock automatically. I’d be willing to bet it’s not many since I’ve had a time finding one, preferably with a keypad and that looks period from a distance.

The original deadbolt was long gone but the door and knob are original and I’m really hoping to bring them back to life. Serving as the home’s security was a “lock” that had a deadbolt keyhole on one side and a standard, if flimsy, latch on the other side. The problem here was two-fold.

The first, and biggest problem, was that this was directly next to a very large window inset into the door. All a miscreant need do to gain access to the house was break the glass and turn the latch. The added problem was that the lock wasn’t even a deadbolt inside the wall, it was just a push latch like the kind you’d see on an interior door.

Here’s my before – the door needs a little love but you can see the blegh lock that was in place.
Since the side kitchen door was similarly afflicted, I clearly couldn’t let these stay too long. As I mentioned, the eventual goal is to add a keypad lock to the front door in the future but since those don’t come in double-cylinder (i.e. locked from both sides) deadbolts, I’ll have to wait until I can order some ironwork for the glass inset.

In the meantime, I found a decent double-cylinder deadbolt for both doors. The one on the front door will probably move to the basement once the iron work is in place.

Once I found locks, I didn’t think it would be particularly challenging to install them. After all, you pull off the existing lock, insert the new one, bolt it in and go, right? Yeah, I thought so too.

While getting the necessary hardware, the salesperson reminded me that the old door would likely be splintery and if I needed to make the opening any bigger for the face of the lock there was a possibility I’d need to hand chisel it.

Naturally, one piece of the lock body was too big for the existing hole and, when I went to expand it, the wood splintered almost instantly. Now, for future reference, the correct tool to use to expand the hole is a dremel on low speed with a sanding wheel in place. Think of this sanding like a haircut, you can always take a little more but you can’t get it back once it’s gone. Since I hadn’t thought of dremeling yet, I set to the rather time-and-energy-intensive task of chiseling out about an extra third of an inch around a hole for my lock haircut-style.

While I’ll consider the chiseling a learning experience, it turned out that the lock didn’t require the hole to be larger although it did make it stronger. If your instructions have you insert an extra plate in front of the lock’s body, you might be in a situation like mine where it’s good to have it if not completely necessary. Feel out the security for your own home, but for me it would have been nice to know there was an option to install the lock without an additional plate under the body before spending two unnecessary hours adapting an old door to a temporary lock.

The kitchen door took me about 15 minutes from start to finish including some light dremeling to make it easier for the latch to move. I guess I learned well on the first one!

As for my new lock, I don't have a good (lit) picture of it on my door but I’ll post that tomorrow evening.

This was one of my highest priority fixes due to security needs so I’ll count every minute as well spent. If you’re looking at replacing locks in your home or have done it recently, feel free to pass along other time saving tips and tricks you’ve found!