Thursday, December 26, 2013

Happy New Year from The House on the Isthmus!

My rather large, rather quirky family celebrates Christmas. Several of the "branches" of my dad's side generally gather in Florida with Grandma to enjoy Italian food as only she can prepare.

What that means for Isthmus House is that I'm not there and The Roommates are holding down the fort. Although this isn't entirely uncommon (see the beginning of this recent post for specifics on just how common it is), I joined the family from a business trip and haven't done anything around Isthmus House for about 2 weeks. Hard to believe.

I knew this was going to be the case for about the last month and took a while to consider if I just wanted to write a post in advance and plop it up here or come up with something better. Since it's the time of year for people I haven't seen in a while to ask me "what's up with the house?" and the New Year is in just a couple of days, it seemed most appropriate to do a quick year in review - but, not to disappoint, also let y'all know what's coming up.

Here's my top 10 favorite moments of 2013:

10. Closing on Isthmus House!

I got about 20 keys at closing - almost all of which were defunct the second I completed our new lock installation.

9. Putting a pry bar to the paneling the wood-paneled shower less than 48 hours after closing...

I just kind of kept going...
8. Finally getting the sub floor level in the downstairs bathroom...

After rather a lot of self-leveling concrete.
 
7. Building a wall from scratch for the first time!


I had a little (okay, a lot of) help from my dad...
6. Refinishing a clawfoot tub from start to finish was pretty awesome...

Repeatedly scrubbing a tub down in July without air conditioning isn't easy - but it is super worth it.
5. Pulling up carpet to find that there was nothing wrong with the floors underneath...
 
And not a tack holding the carpet to 'em!

4. The back yard becoming a yard...

As opposed to a jungle... nine hours later...

3. Finding old papers behind walls, baseboards and the living room paneling...

I wonder what else I'll find...


2. Ending the Saga...

I kind of love this bathroom...

And last but certainly not least:

1. Hanging my bedroom door!

Because there's nothing like a little peace after some work around Isthmus House!

Needless to say, it was an eventful year here at The House on the Isthmus and we have a lot to be thankful for beyond this list. Here are a couple of the things that are planned for early next year!

1. Finish exposing the brick in the upstairs foyer (the top's not even close to done).


2. Redo the kitchen!
3. And the upstairs bath - I'm only opening that ceiling once!
4. Remove the kitchen upstairs to make it a master bedroom.
5. Move The Roommate upstairs and restore her current bedroom to a den.

Of course, there are plenty of other things (the foyer, refinishing almost every wall and a lot of floors, etc.) to work on too. Can't wait to see where we are this time next year - better get started!

Happy New Year!

Thursday, December 19, 2013

It was just covered up!

Let’s start this week with one simple fact: The House on the Isthmus is always surprising me which is saying rather a lot considering the number of surprises we’ve ushered in the last six months. Now that we’ve confirmed that, brace yourself for its latest surprise.

Now we can proceed with the story leading up to it.

My bedroom door installation was no easy feat. In fact, a detail I left out of the story from a couple of weeks ago was that I actually intended for it to swing left and into the corner of my bedroom. That ended up not being possible because the floors aren’t level and it would ground out when we went to open it.

To get started on the original plan, I had to remove the transition piece from between the hallway and my bedroom. That also meant removing just a little bit of the flooring in the hallway so that we could drop the door into its desired position.
The floating floor pretty much untouched
A couple of weeks ago, the City of Madison sent me a note letting me know that they took exception to my Bagster being in the front yard and that it had to go. Since it wasn’t full and I don’t want to upset the City, I decided to pull up the old flooring (since I now knew there was hardwood underneath it all) to fill the Bagster with whatever pieces I couldn’t salvage before the deadline for it to be taken away. When we hung the door, I pulled only a couple of tiles before moving on to other projects around the house.
It’s not like I expected to just pull up the existing floating cork floor (that I think was one of the lipstick on a pig projects completed right before I bought the house) and magically find nice hardwood floors. I hoped, maybe, but I didn’t see myself getting as lucky as in The NewRoommate’s room twice… and I didn’t.

Underneath the floating floor (so called because it’s not glued or nailed down to anything, it just locks to itself) was a floor pad (not interesting) and under that gem was linoleum tile. Not vinyl peel and stick, mind you. It was linoleum. Now, linoleum is actually a great, period correct floor covering material in certain forms but this was more like the 1960s and didn’t quite fit one of those forms.

The floor pad - yep, that's duct tape!


Trust me, keep reading, it’s about to get good.

Up came the floating floor in about ten minutes and I managed to save six of the 12-15 boards that compiled the hallway floor to donate later. Best demo project ever.

Then up came the pad and there it was, my latest surprise from Isthmus House: a grate set into the floor.


After some diligent scraping of the tar-paper-like adhesive with my very glamorous floor scraper (a razor blade on a paddle, essentially) everything that could go in the aforementioned Bagster did.


Once everything was up that was going to come up, I baby-powdered the floor to make it less tacky and wiped it all down.

I realize it’s not done yet, but doesn’t it look better at least? I can't wait to get them fully refinished!

Thursday, December 12, 2013

A new meaning for Christmas lights

Salvage shops are awesome. To date, I've only found one in Madison. Detroit (and the surrounding area), however, has a fair number. That could be because large chunks of the city are being gutted. The more sentimental part of me hopes it's because people there recognize the history salvaged items represent.

Either way, my voyage over Thanksgiving paid some serious dividends when my family and I went to visit a few.

The first was a place in Toledo. I have no idea what the name of the place was anymore but the name of their website is Cool Stuff is Cool Stuff and I'm inclined to agree with them. While they had some beautiful items, they've sadly gone the way of many salvage shops and were quite expensive.

I did find a heat register cover that I'm working on for the bathroom, but that was about it at that one.

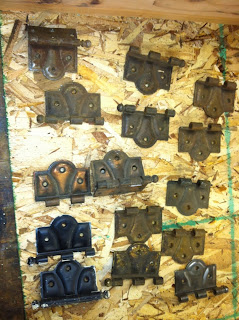
On our way home, we decided to stop by another shop in Ypsilanti about a mile from my sister's house. I've had a really hard time finding hinges that match all of the others in the house. All but 5 doors have them - and the doors that don't currently have them aren't original doors.

I've also been looking for a light for the dining room pretty much perpetually since I bought Isthmus House. I've come close to buying a few and had pretty much resigned myself to the likelihood that I would have to go with a reproduction. The one that was hanging in the dining room when I bought the house wasn't a real option.


When we hit the front door of the store, they immediately said that they likely had a few of the hinges I was looking for and often got more in. I've been looking for these hinges for six months. They had the two I needed right in the store and, yesterday, they texted me to let me know they just got in plenty more and to ask how many more I needed.


I could hardly believe it.

All of that is great - see the aforementioned six month hinge search - but the best was what I found that I didn't really mean to. While one of the store employees was searching for those hinges (there are buckets of them), we took a look around.

Several items drew my attention and little bit of envy but there was one that I could actually afford and needed for our home: a new light.


Made by the Steuben Glass Works in 1905, it's not perfect but it looks, in the words of Nicole Curtis, "looks a lot better than I will in 100 years." With a molded, acid-cut milk glass shade and brass chain links, I think it's perfect for Isthmus House and will nicely tie the dining room together.


As my Christmas gift to myself this year, I can't wait for everyone to see it at my birthday/Christmas party on Saturday!

Friday, December 6, 2013

Cross another one off the list: Katie has a bedroom!

Many of you know that I travel a lot for work. Like, I’ve spent almost as many days in hotels this year as I’ve owned Isthmus House. Perhaps that’s why, as I sit here with my square, plastic Delta spoon in my hotel room munching on grocery store salad bar fare, I’m feeling slightly reminiscent for my recent visit from my parents. Let’s be honest, the best reason is probably getting home cooking that I don’t have to cook but I always get a lot done around the house, too. 

This most recent visit was no different. It wasn’t the original plan for the weekend, but we ended up putting in a wall between the former upstairs living room (now my bedroom) and the former upstairs kitchen (now my workshop but it will be the master bedroom eventually) and a door leading to the hallway.

There was one obvious problem with this plan from the beginning: I didn’t have a door that fit the opening. I had an existing door jamb and stops, but not a door that fit.

There were a couple that had come with the upstairs apartment but neither was a viable option. One wasn’t the same style as the original doors (you can stop laughing at me now, I won’t put in a door that doesn’t match the originals!) and the other had been chopped up like crazy (think rhombus).

Here’s what the original doors in the house look like. As you can see, this one was cut down and a deadbolt added to make it the upstairs unit door. In case you're wondering, it's also a rhombus:


Once I figured out that I wasn’t going to find a four panel door to match my existing ones at either of my local Restores, I tried online but couldn’t get one I found in Ohio to Isthmus House in time for the visit.

I did get a door in time. A while back, The Roommate and I stopped by Ace Hardware on Willy St. picking up a couple of things for Isthmus House and met one of their employees who also restores antique windows and knew of a salvage shop in Madison. Naturally, I couldn’t remember anything about it but I still had his card (because I’ll probably need to restore some windows at some point) and he gave me directions when I called.

The owner, Roxy, has been in business for 30 years and helped me put together a full 4-panel door (that matches the original doors in the house) including mortise, doorknob and hinges. I even picked out the screws that attached the plates to the door. We spent a couple of hours on this project but it was worth every bit for the final product – and was about half the cost of the door in Ohio before shipping.

The second day of their visit, my dad and I built a small wall frame out of 2x4s to fill in the archway so that the drywall would have something to attach to. Since it fit with minimal shimming (there’s no such thing as a straight wall in a 100 year old house so you’ll have to shim something) and I didn’t cut off any appendages, I’m calling it a success!

Once the wall was in, we put up the drywall I already had from one of my first projects around the house. I’d never drywalled without a contractor present but it turns out it’s not that easy to mess up. As long as you get the screws flush or sub-flush in the wall and you hit studs (and lath, in my case) with every screw, you’re good to go. Both of those steps are important!

Normally, you hang drywall top to bottom and stagger the seams of the sheets. Because the sheets were perfect for the height of the walls we hung them vertically. They went up in about an hour, not including cutting one of the three sheets to size. Since I’m still a work in progress with mudding and taping (it’s a skill to get the seams and screws to blend in nicely, and not really one for beginners hoping for a decent final product), my dad, who’s very good at it, handled that part.


While we were waiting for the first coat of mud to dry, we cut the door down to fit the opening. It took a while due to the floor having a slight slope (the floors are never level either) and we ended up making it swing right so that it wouldn't scrape the floor but it did finally fit in the opening.

Although the long-term plan is to use some re-tinted paint whose color I didn’t like the first time throughout the upstairs, it’s not re-tinted yet and using it would have just been a waste of paint. Instead, we gave it a quick coat of leftover primer+paint from the living room. Once we moved my bed to that wall it looked a lot more complete.


I don’t see myself ever hanging a door on my own because they’re just too unwieldy. We couldn’t quite get to hanging it during their visit so I had a contractor hang it for me. It took a few phone calls and a couple of pairs of hinges but its done and it opens and closes smoothly!
 
 
The Roommate and I sat on my bed for a couple of minutes enjoying another finished project and reminiscing about Isthmus House when we first moved in. As she said it: This is why I bought Isthmus House; for the feeling of accomplishment and contentment that comes along when another line on my to do list gets crossed off. What do you think of our final product?


Thursday, October 31, 2013

Sometimes things change...

I got started restoring Isthmus House before it was even Isthmus House. When I put in the offer and it was accepted, I was ready to go with no place to go.

I already knew how bad the wood-paneled shower was and I had an idea of what I wanted to do with it. I really wanted to put in a dresser style vanity with a marble top – two things my mother “just happened to find” on Craigslist right when I needed them.

Now, of course, these things don’t exist in the wilds of Craigslist ready to go; you have to make them into something you want to feature in your bathroom.

So I took the cheap, real wood dresser and got started.

You can see the polyurethane that I started to sand off in this photo. It was so pretty as it returned to natural wood.

 
It took a long time to get into every crevice sanding. Due to some of the details in the woodwork, I had to do a decent part of it by hand to prevent a power sander from stripping off the character along with the dated polyurethane.

Eventally, though, I got to clean wood.   


But, since mold and mildew aren’t that appealing, you can’t have a bathroom vanity of raw wood and the stain and new, non-gross poly had to go on.

The first coat of stain took pretty well and wasn’t blotchy. The plan when I stained it was to lose the wood top altogether for a sink top so I didn’t stain it.


It took a few more coats of stain (letting them dry and soak in and never puddle) and a couple of poly before I was happy with the results but happy I ended up!


Once it was dry and moved into the new place, we threw the aforementioned Craiglist-find hunk of marble on it in the dining room and treated it as a sideboard while we were working on the wood-paneled shower bathroom.

That bathroom eventually received the pedestal sink I’ve shown here because of the expense of moving plumbing. Since we couldn’t use it in there any longer and, as you’ve probably heard me bemoan, there’s approximately 7 (I’m not exaggerating) square feet of counter space in our kitchen (we were using stools as countertops in the corner), we took a different route.

We eventually moved it into the kitchen as a makeshift island. It’s really been a lifesaver since, in case you're wondering, stools don’t make great countertops.

Here’s the final product in the kitchen:
 

Obviously, we love it – tonight we rolled out simple biscuits on it to go along with a super healthy chicken stew. Yay, untreated marble!
So that was the very first project for the House on the Isthmus. I wonder what the last will be?
 

Friday, October 18, 2013

And you decided this was a good idea because...?

This post isn't quite as colorful as most and doesn't feature any of the work being done in Isthmus House right now but I promise those updates are on the way. Instead, I apparently now take requests for post topics and this was my first response to popular demand!

I started this blog because I was regularly being asked what was new with Isthmus House and because I was thinking of starting a journal of House activities anyway (so why not publish it?). Now, the question I get asked almost as much (what's new with the house? still reigns supreme) is why I chose to do this and, to a lesser extent, how I got started.

While the best answer is probably that I'm crazy, that's not the whole story.

In case you don't know me personally, here's a little background. I grew up in Detroit which I've probably mentioned, and I love that city. It's full of culture and art and lots of fun and interesting people. There are a lot of old houses and old buildings and many of them are falling into disrepair because Detroit has struggled in recent years. They look sad which makes me sad. But Detroit is a fighting city if ever there was one (Joe Louis, anyone?) and the city is on the upswing.

I also don't like that people throw things away that could be used again or a different way and I really like the saying "waste not, want not." I think that applies to homes in a special way. I really love homes that harken back to a day when things were constructed well and people stayed in their homes with their families and things were maybe a tiny bit more stable.

All of that said, I honestly figured out that I could do this by watching Nicole Curtis save homes on DIY Network and I figured that, if she could learn how to restore homes successfully, I could, too. I'd tossed the idea around for a while but I had to wait for what my mother called "the perfect storm." Right house, right price, right time, right plan.

If you're interested in doing this (and I know some of you readers are!), here's the best way ro get started: start reading and planning. I'm not talking about reading this blog or watching Rehab Addict although they should be helpful and it's probably the most honesty you're going to find about a restoration.

Here's a starter checklist:
Read articles about the real estate market in your home town and talk to a realtor. I found mine, Tobi, who was and continues to be incredible, through friends. She gave me straight information and found the right house for me and the Roommates. Learn about the older, historic neighborhoods in your area.

Figure out what kind of house you like and what you like about those houses. I'm not crazy about some super simple, linear mission style homes. I love that my house has some features that indicate the turning tides of 1910 from Victorian to Edwardian to Craftsman styles because it reminds me that more was changing in the 1910's than the facade and trim of a house (US women's suffrage, commercial flights and refrigerators and lots of world political movement, to name a few from that decade). The little things, like my simple original baseboards upstairs, make up what I love about my house - and they lead me to my next point, saving money.

Make sure you're pretty financially secure before you start your endeavor. Your mortgage, taxes and PMI (mortgage insurance if you don't put down 20% generally) and your construction budget are the obvious monthly costs but restoration can mean finding unpleasant surprises in the walls, ceilings and floors once they're open (and, trust me, you'll open them at some point). Once you find them, those things have to be fixed which can result in budget overages. Figure out if you can afford to not live in a home while you restore it (easier logistically, but more expensive!) or if you have to live in it while you're working on it to make it feasible financially.

Learn what things cost so you can be realistic about a budget. You can always find ways to economize but if you're not planning to work around the house much yourself, it'll be more important to get an idea of how much work (which equals money) it takes to redo a bathroom or a kitchen. I wasn't realistic on my first project's plumbing costs and my shower as a whole cost me about $2400 even with my penny pinching. If you know you have expensive taste, be prepared to take a step back and evaluate the needs of the house before you spend half of your kitchen budget on a 6-burner commercial grade range.

This might be a soapbox moment (I've been known to have a few) but stay true to your house. When The (original) Roommate and I started house shopping, we saw one house that I loved (original cabinetry and woodwork in beautiful shape) except for the extremely modern first floor bathroom and shower. It was an expensive bath that was well done but that already looked a bit outdated despite only being a few years old. If the originals (or an original) aren't available, choose styles and materials that belong to the era of the house, they'll never look outdated. As an added perk, there's no nicer compliment to hear than someone asking you if that wall of subway tile was original.

So, that's how I got started and the advice I'd give someone who was interested in giving it a shot. And call me. Or Facebook, snail mail, email or Pony Express. New updates about what's actually happening in The House on the Isthmus to come!

Friday, October 4, 2013

The End of the Saga of the Wood Paneled Shower: The Final Reveal

IT IS FINISHED. The Saga, that is.

The shower curtain is up. The sink doesn't drip. The shower works. The floor is gorgeous. There's a door. And the best part? It looks like it could have come out of this house in 1910.

This project has been a heck of a run. It was perfectly project planned for a 3-4 week (including contingencies) restoration. I even took vacation.

3 months later, it's complete, functional and beautiful. The Roommates (and my friend Todd) are sitting with me and agreeing with every word I type here.

As I covered in Part I of The Reveal, there were a lot of steps and surprises and a lot of help received from friends and contractors through this.

All of these things come down to what you lovely readers really care about. The finished product.


You'll notice a couple of things I didn't feature specifically in other posts.
 
The paint and beadboard meet in a perfectly level line and let me use my new nail gun. I found the storage tower next to the sink on Craiglist for about 40% of retail cost. The mirror was a second try (the first one required patching rather large holes in the wall after brackets broke in the lath) but I think it ended up nicely. The sink was also a Craiglist find for about 30% of retail and the faucet cost me a grand total of $9 instead of the $250 retail price tag.
 
I'm happy with it. The Roommates are happy with it. I can't wait to have guests! And now, I need to find my next project. Stay tuned for next week's post!

Thursday, September 12, 2013

The Beginning of the End of the Saga of the Wood Paneled Shower - The Reveal Part I

Happy days, friends of Isthmus House! The bathroom has made progress and is finally ready for Part I of The Reveal!

To do justice to a reveal, I've decided this has to be done in two parts. One, so that you lovely readers don't just have to listen to the chronicle repeated and two, because there's so much wonderfulness that I want you to be able to enjoy it as much as The Roommates and I.

To recap, we started with wood paneling pretty much everywhere in this bathroom. The shower surround, the wall between the shower and toilet, and the "wainscoating." I'm pretty sure the only thing that wasn't paneled was the 60s grasscloth wallpaper and the fixtures themselves (I'm mostly sure about the fixtures).

In Part I, we pulled out quite literally everything from the bathroom and found some unpleasant surprises (read: my floor sloped two inches in places). In Part II, we replaced two walls that were full of mold with new cement board, greenboard and Red Gard for waterproofing. My sister and I tiled those walls with subway tile in Part III and I (and, I suppose, my plumber :)) continued my saga by putting in a beautiful, new-to-us clawfoot tub that I lovingly restored. For 9 hours. After dealing with lots of tiling troubles in Part V, I pulled down the tile ceiling to learn that there are different definitions of all new electrical before getting new, bright lighting and a ceiling. Last week, Isthmus House's first major project started to get refinished walls and the electrical was finished.

This week, we got walls completed, baseboards, chair rail and beadboard up, and the walls got painted! And so, it's time for a reveal.


The aforementioned clawfoot was a bear. It was a pain to find, sand, paint, plumb, etc, etc. But it's AMAZING now that it's complete. We'll be putting a curtain around it but it seemed silly to cover up the tile for the sake of The Reveal. The toilet was original-to-me and the beadboard you can see to the right of it is new and makes the room.
 
The Roommate had a friend visit a while back that also works on restorations. Best compliment ever: he asked if the subway or marble basket weave were original. Mission accomplished!  


The window stayed despite a contractor's recommendation to remove it. There wasn't a reason to remove it since it's going to be covered with a wrap-around curtain (and I added a fan)! This is also the first time we're showing the detail at the top of the subway tile wall! It's black hex tile with the same dark grey grout the subway tile shows off that gives the room just a little extra detail and interest and every tile is perfectly spaced.
 
You can also see the black pencil tile that frames the wall (and took lots of trial, error, the occasional broken tile and eventually retiling 15 subway tiles to work). The wall color turned out to be perfect. The Roommates agree, the original color was too blue for the room but this one is soothing, period appropriate and it makes the room.


This bathroom has been the project that just won't end but it's ending. Get ready for the second half of the room - and the end of the Saga! 


Friday, September 6, 2013

And I suppose walls would be nice too...

I've mentioned Rehab Addict and host Nicole Curtis at least a couple of times so far in my posts about the House on the Isthmus but I've never had news quite this exciting:

I got to work with her on her project in Detroit over Labor Day weekend!

On Saturday, Sita and I went down to visit the fence-building. It's hard to believe such an overgrown lot can look so good - not to mention the house! The new season is coming on October 17 so you'll be able to see it too!

Nicole needed help with taping and painting up the house on Monday so my little sister, Laura, and I went down to Detroit (real Detroit :)) to offer a hand before I headed to the airport. It was a lot of fun and it was pretty cool to see a house go from missing siding and windows (it had a fire a while back) to looking like an actual house.

At Isthmus House, we're making progress too! In the downstairs bathroom project that just won't end, we're almost done repairing the walls after the mix of plaster, drywall and cement board made for a mess of ridges and cracks. I can't wait to get paint on them! I ended up with this beautiful Marine Reef color that's very similar to a color produced in 1910.


There's one small delay though - my walls aren't ready to paint. As I've mentioned in past posts, we've had some trouble with the plaster/greenboard/cement board to date. Where any two materials met, the walls were ridged and looked piecemeal.
 
So, they're being refinished. That means lots of cleaning and taping off, sanding, skimcoating, more sanding, more skimcoating and more sanding. I'm hoping to have everything painted by the end of the weekend so that I can FINALLY post the reveal! Here's what the walls and ceiling looked like as of last night:


As you can see, the grey parts aren't yet dry. Once they are, though, the sanding will begin again and then finally priming and painting!
 
You might see something else fun in the pictures though... New electrical! While the overhead light/fan combo was already featured in a previous post, the sconces, outlet and switches are new!


Once the walls are complete, we just have the mirror and shelving installation, replacing the door and trim and replumbing the sink! That's a tiny list comparatively and I'm so excited!

Here's hoping next week's House on the Isthmus post is all about the reveal!

Thursday, August 29, 2013

Isthmus House reveals a good surprise!

When I started writing this post, I had a few moments of writer's block. I realllllly want to write about the awesome new bathroom and how it's done and perfect and was all worth it. But that wouldn't be true solely because the bathroom isn't quite done yet. Hopefully I'll be able to write about it next week!

In recent posts, I've been talking about getting things ready for our new Roommate coming in this week. In preparation for her arrival, I pulled the carpet out of her room. Very attractive, no?


I started off by buying a new Bagster. If you've ever done a restoration (or renovation, for that matter) project, you know how much debris can pile up even when you try to save and reuse everything. Bagsters are about $30 at Home Depot (I haven't found anywhere you can buy them) and under $100 to get them picked up in my area - sometimes you can even save a few bucks by searching for and adding a promo code when you schedule pickup.
 
Once I had my Bagster set up in my front yard (I'm sure my neighbors love that), I got started pulling the quarter round from around the room. Most of it pulled up by hand - I only needed my pry bar for one small piece by the closet. I was hoping to be able to save and reuse pieces but it split when I pulled it up so it had to go into the Bagster.
 
I had checked the edges of the floor to make sure they were in decent shape before I pulled everything out and they looked fine from that vantage point. If you've been reading the other posts, this is usually followed by a groan, thinking that I'm about to say "but..."
 
No "but" here!
 
I used a carpet cutter, which is stronger and sharper than your average utility knife, to cut the carpet into strips. From there, you can roll it up and duct tape it so it's much more manageable. I wish you luck trying to pull 100 square feet of carpet out in one fell swoop!
 
It took me a grand total of about 20 minutes to cut the carpet, roll it up and tape it. Add another 5 minutes for getting it all into the Bagster and you're looking at a pretty great quick and easy update for Isthmus House.
 
If you've ever pulled carpet up, you know that it's often tacked or even glued to the floor - which would have been heartbreaking with this old hardwood. Miraculously, there wasn't even a single tack or bead of glue on any of this carpet - it had been held down entirely by the quarter round trim and had only a squishy, decent quality carpet pad under it.
 
There can be good surprises at Isthmus House and this is one of them! Check out these floors!


 The next great thing I'm thinking? The downstairs bathroom! Get excited; I certainly am!
 

Thursday, August 22, 2013

From the junglllle! To a yard!

I've heard that gardening is peaceful and relaxing for some people. I don't think I'm one of those people.
 
In last week's post, I mentioned that we're getting a new Roommate and said new Roommate comes with a dog, a mini-schnauzer mix named Rosie. In light of this development, The Current Roomate and I assessed various parts of the house and decided that the state of the yard as it sat was potentially hazardous to Rosie.
 
Why, you might ask? It was so far overgrown, we couldn't see about half of it to know if there were any holes in the fence or small animal families that might pose a threat to a little (well, small/medium) dog.
 
When I say overgrown, I'm not exaggerating. Far from it. Here are the before pictures:


The back door to the basement
 
Back wall fence - that you can't see (it's about 6 ft tall!)
 
Corner of the back yard
 
Shared fence with the neighbors (that's their garage in the background)

 As you can see, not exaggerating.

Naturally, the Roommate and I decided to stay in on Friday so that we could go to bed early and get up around 9 and get to work. That is, until some friends were over until 2ish and we got a little distracted.

I was still up at about 9:30 (huzzah!... minus the wake up) with my coffee keeping me company in the back yard. I got to work pulling the easy-ish weeds by the house and the gate so that the door could close. 2 hours later, here's the progress I left for a couple of hours so that I could head to the gym.
The back of the house by the basement door

 
A gate no longer held open by weeds!
 
As my trainer said, it was kind of like a 2-a-day gym session... except more like 3 or 4-a-day.

When I got back home around 1:30, the Roommate (who surprised me with a clean kitchen!) and I got back to work clearing the yard. We used shears to cut the incredibly invasive grapevine that was threaded alllllll the way through all of the fencing, cherry tree and other plants and pulled it down. In the process, we lost some of the plants we'd planned to keep. Our guesstimate is that it took us about 3 hours total to remove the grapevine since there was more every time we turned around.

The things that were just too stubborn to pull, like the clover and super overgrown grasses, got weed-eatered with a powerful weed eater borrowed from my friend "Witt" and her boyfriend Brian.

At about 6 or 6:30, we took a water break. It might seem like an odd time for a break but this is what we left in the yard - it's about 3 feet tall and 7 or so across:


After our water break, we decided that it was time to bag it up so it wouldn't get soggy or seem like a good place for small creatures to live overnight. The bagging took us about an hour - we were admittedly a bit slower on bags 3-7 than at the beginning and end of the process.

At the end, we got everything into 10 packed bags around 7:30. I think my glee is rather evident here.


That turned out to be the perfect time for our friend, Todd, to arrive and fix the fence so it could actually swing freely. The Roommate and I got cleaned up for dinner while he added a support beam to the gate:


And here's the final product:

 
The back door to the basement - that you can actually walk to!
  
The pretty and grapevine-free cherry tree
 
The same back wall of fencing!
 
We found about 4 small but established trees, lots of random pavers and a few animal burrows we didn't know were there and managed to save a couple of hostas, lilies, daisy-like flowers, a raspberry plant or two (there was one raspberry, The Roommate and I split it and it was delicious) and the cherry tree.

All in all, not a bad day's work and for a grand total of about $40 for a new claw cultivator and yard bags! There's still a little cleanup to be done but I can't wait to replant a little bit and use the yard at our eventual housewarming party - stay tuned!


*Awesome tip if you're clearing your yard soon: We found that these gloves allowed us to use the touchscreens on our phones even with them on. Not bad for $1/pair!